
The capability
What visual grounding is
As you already know from M4, a vision-language model, a VLM, takes an image and some text and writes text back. Ask one "is there a horse in this picture?" and it'll say yes. For years that was about as far as it went, because if you then asked it to draw a box around the horse, the box would land somewhere near the horse, or on the wrong side of the picture, or the model would say it couldn't give positions at all. It could recognise the horse and it couldn't say where it was.
Visual grounding is the second half. The input is an image plus a text description of something in it, like "the horse" or "the Render menu" or "every icon", and the output is where that thing is, as a bounding box, which is four numbers giving the left, top, right and bottom edges of a rectangle around it, or as a single point. The description is what makes it grounding. A classic object detector finds the categories it was trained on, like "person" or "car", while a grounding model finds whatever the text names, including things nobody trained it on by name.
Whether you want a point or a box depends on what happens next. An agent that clicks only needs a point, and many computer-use tools ask for exactly that. A box carries more, though. It tells you how big the target is, which is what you crop around when you want a closer look, and it's what you compare against a correct box when you measure accuracy. Most of this module asks for boxes and clicks their centre, because the extra two numbers pay for themselves the first time something goes wrong.
Grounding isn't something only VLMs do, either. There are models built for nothing else, grounding models like Grounding DINO, which take an image and a phrase and return boxes, and are small enough to run locally. There are also grounding models trained on screens, which find UI elements from a description. For years those dedicated models were far better at placing boxes than any VLM, and VLMs have only caught up recently. Section 6 compares them, and this module follows the VLM route because that's where most agents now start.
In September 2026 I took a screenshot of Blender, the open-source 3D program, and gave GPT-5.6 Terra one instruction, "draw a red bounding box around every icon and a blue bounding box around every label". No positions went in with it. The model found nearly every icon and piece of text on a crowded professional screen and drew the boxes by editing the screenshot, and to draw them it had to know where each element was first.
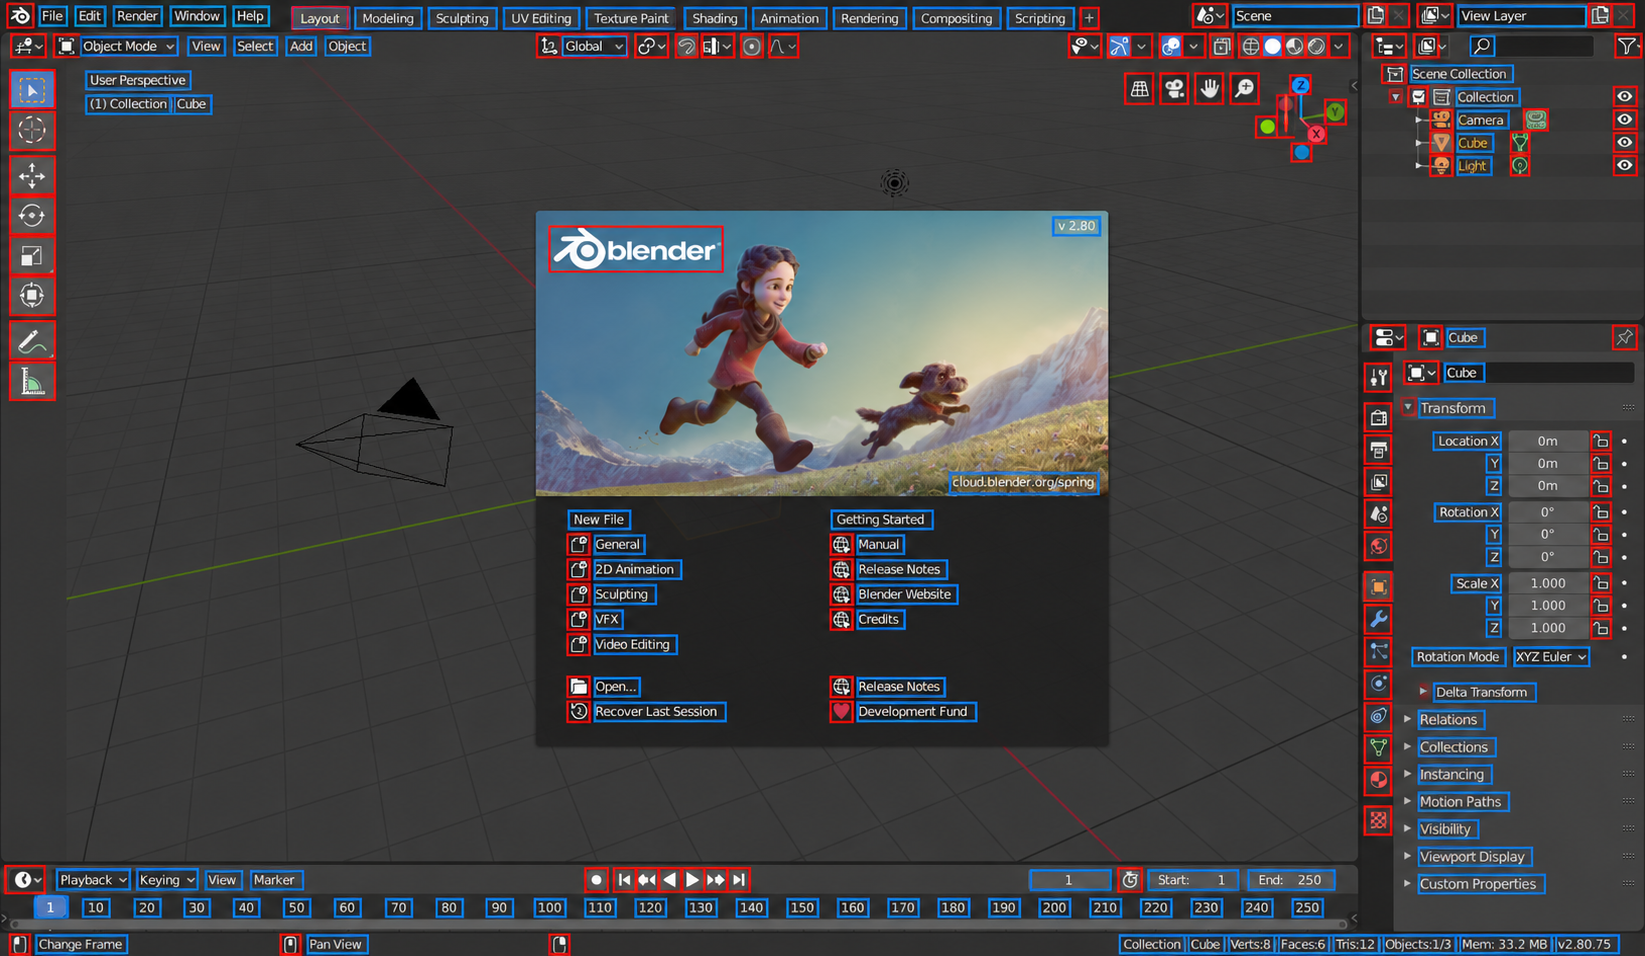
Grounding still can't read your intent. Look at the outliner in the top right of that screenshot. Collection, Camera, Cube and Light each have an eye icon beside them, and the four eyes are pixel-for-pixel the same. Ask for "the eye icon" and the model picks one, and nothing in the box tells you it had a choice. That problem is solvable, and a lot of my own work went into it. What worked was building a good harness around the model, using image-to-image encoders and multimodal encoders to match candidates, with VLMs as part of the loop too, and section 7 walks through it. The model also can't see what isn't in the image, like a menu item that only appears after a hover, and its boxes are estimates that can be a few pixels off, which is a lot when the target is a 12-pixel icon. And the model only knows the image it was sent. If your code resized the screenshot on the way, the numbers describe the resized image, which section 4 is about.
Some places it shows up
- Computer-use agents that operate an application from screenshots, finding the button to click next. This is the running example in this module, and the loop M18 described for tools, with a click as the tool.
- UI test automation that checks a screen looks right and clicks through it, without depending on element ids that change between releases.
- Document work, like finding where a field sits on a scanned form so the value can be read or redacted, which M23 builds on.
- Robots and cameras, where "the red bin on the left" has to become a position an arm can reach.
These are examples, and grounding shows up anywhere a program needs a position from a description. The inputs and outputs are the same in all of them, an image and a description in, a box or a point out, and the same things go wrong, mostly in how the numbers are read back.
The running example
Northlight's agent clicked beside every button
Northlight is a small animation studio. It's invented, and so are its numbers. Its artists spend part of every week on the same Blender chores, opening a scene, setting the render resolution and frame range, exporting, and saving under a naming scheme. So an engineer built an agent to do them. The agent has no access to Blender's code. It works the way a person does, by looking at a screenshot of the current screen, deciding what to click, clicking and looking again.
The first version, built in the spring on the models available then, did everything right except find things. Asked for the position of "the Render menu", the model answered with a box that was near the top of the screen and nowhere near the word Render. On small icons the boxes were mostly guesses. The agent logged its reasoning, and the reasoning was fine, since it knew it wanted the Render menu and why. It just couldn't say where the Render menu was.
The second version switched to a newer model and got good boxes back, and the clicks still missed, every one of them by the same pattern. A click meant for a button near the middle of the screen landed far down and to the right of it, and a click near the top left landed close to its target. That pattern is a coordinate bug, a factor of two between the screenshot and the screen, and section 4 finds it. The team fixed it, and then switched providers for a price test and every box came back transposed, with x and y swapped. The model was fine both times, and the code reading its numbers was wrong.
The third version, on GPT-5.6 and then GPT-6, finds nearly everything Northlight asks for, including the small icons. Its remaining failures took the longest to fix. Asked to hide the light before a test render, it clicked an eye icon in the outliner, and on some scenes it was the camera's eye. Asked for "Release Notes" on the splash screen, it hit the link in the wrong column about half the time, since the splash shows two of them. And a two-minute export task that worked on most days failed often enough that the artists stopped trusting it, even though each single click was right almost every time. The rest of this module is the work of fixing those, which means converting coordinates correctly, telling apart targets that look identical, deciding when to trust a prediction, measuring accuracy on Northlight's own screens, and knowing when a cheaper component would do the job.
How the model sees an image
How a VLM turns a screenshot into something a language model can read
A language model works on tokens, as M3 showed, and its core is a decoder, a transformer that reads a sequence of token vectors and predicts the next token. Nothing in that design knows about pixels. A VLM gets around this by turning the image into vectors of the same size as the language model's token vectors, so the decoder can read image and text in one sequence. Most VLMs you'll meet are built from three parts, and it's worth being able to name them, because each one explains a different grounding failure.
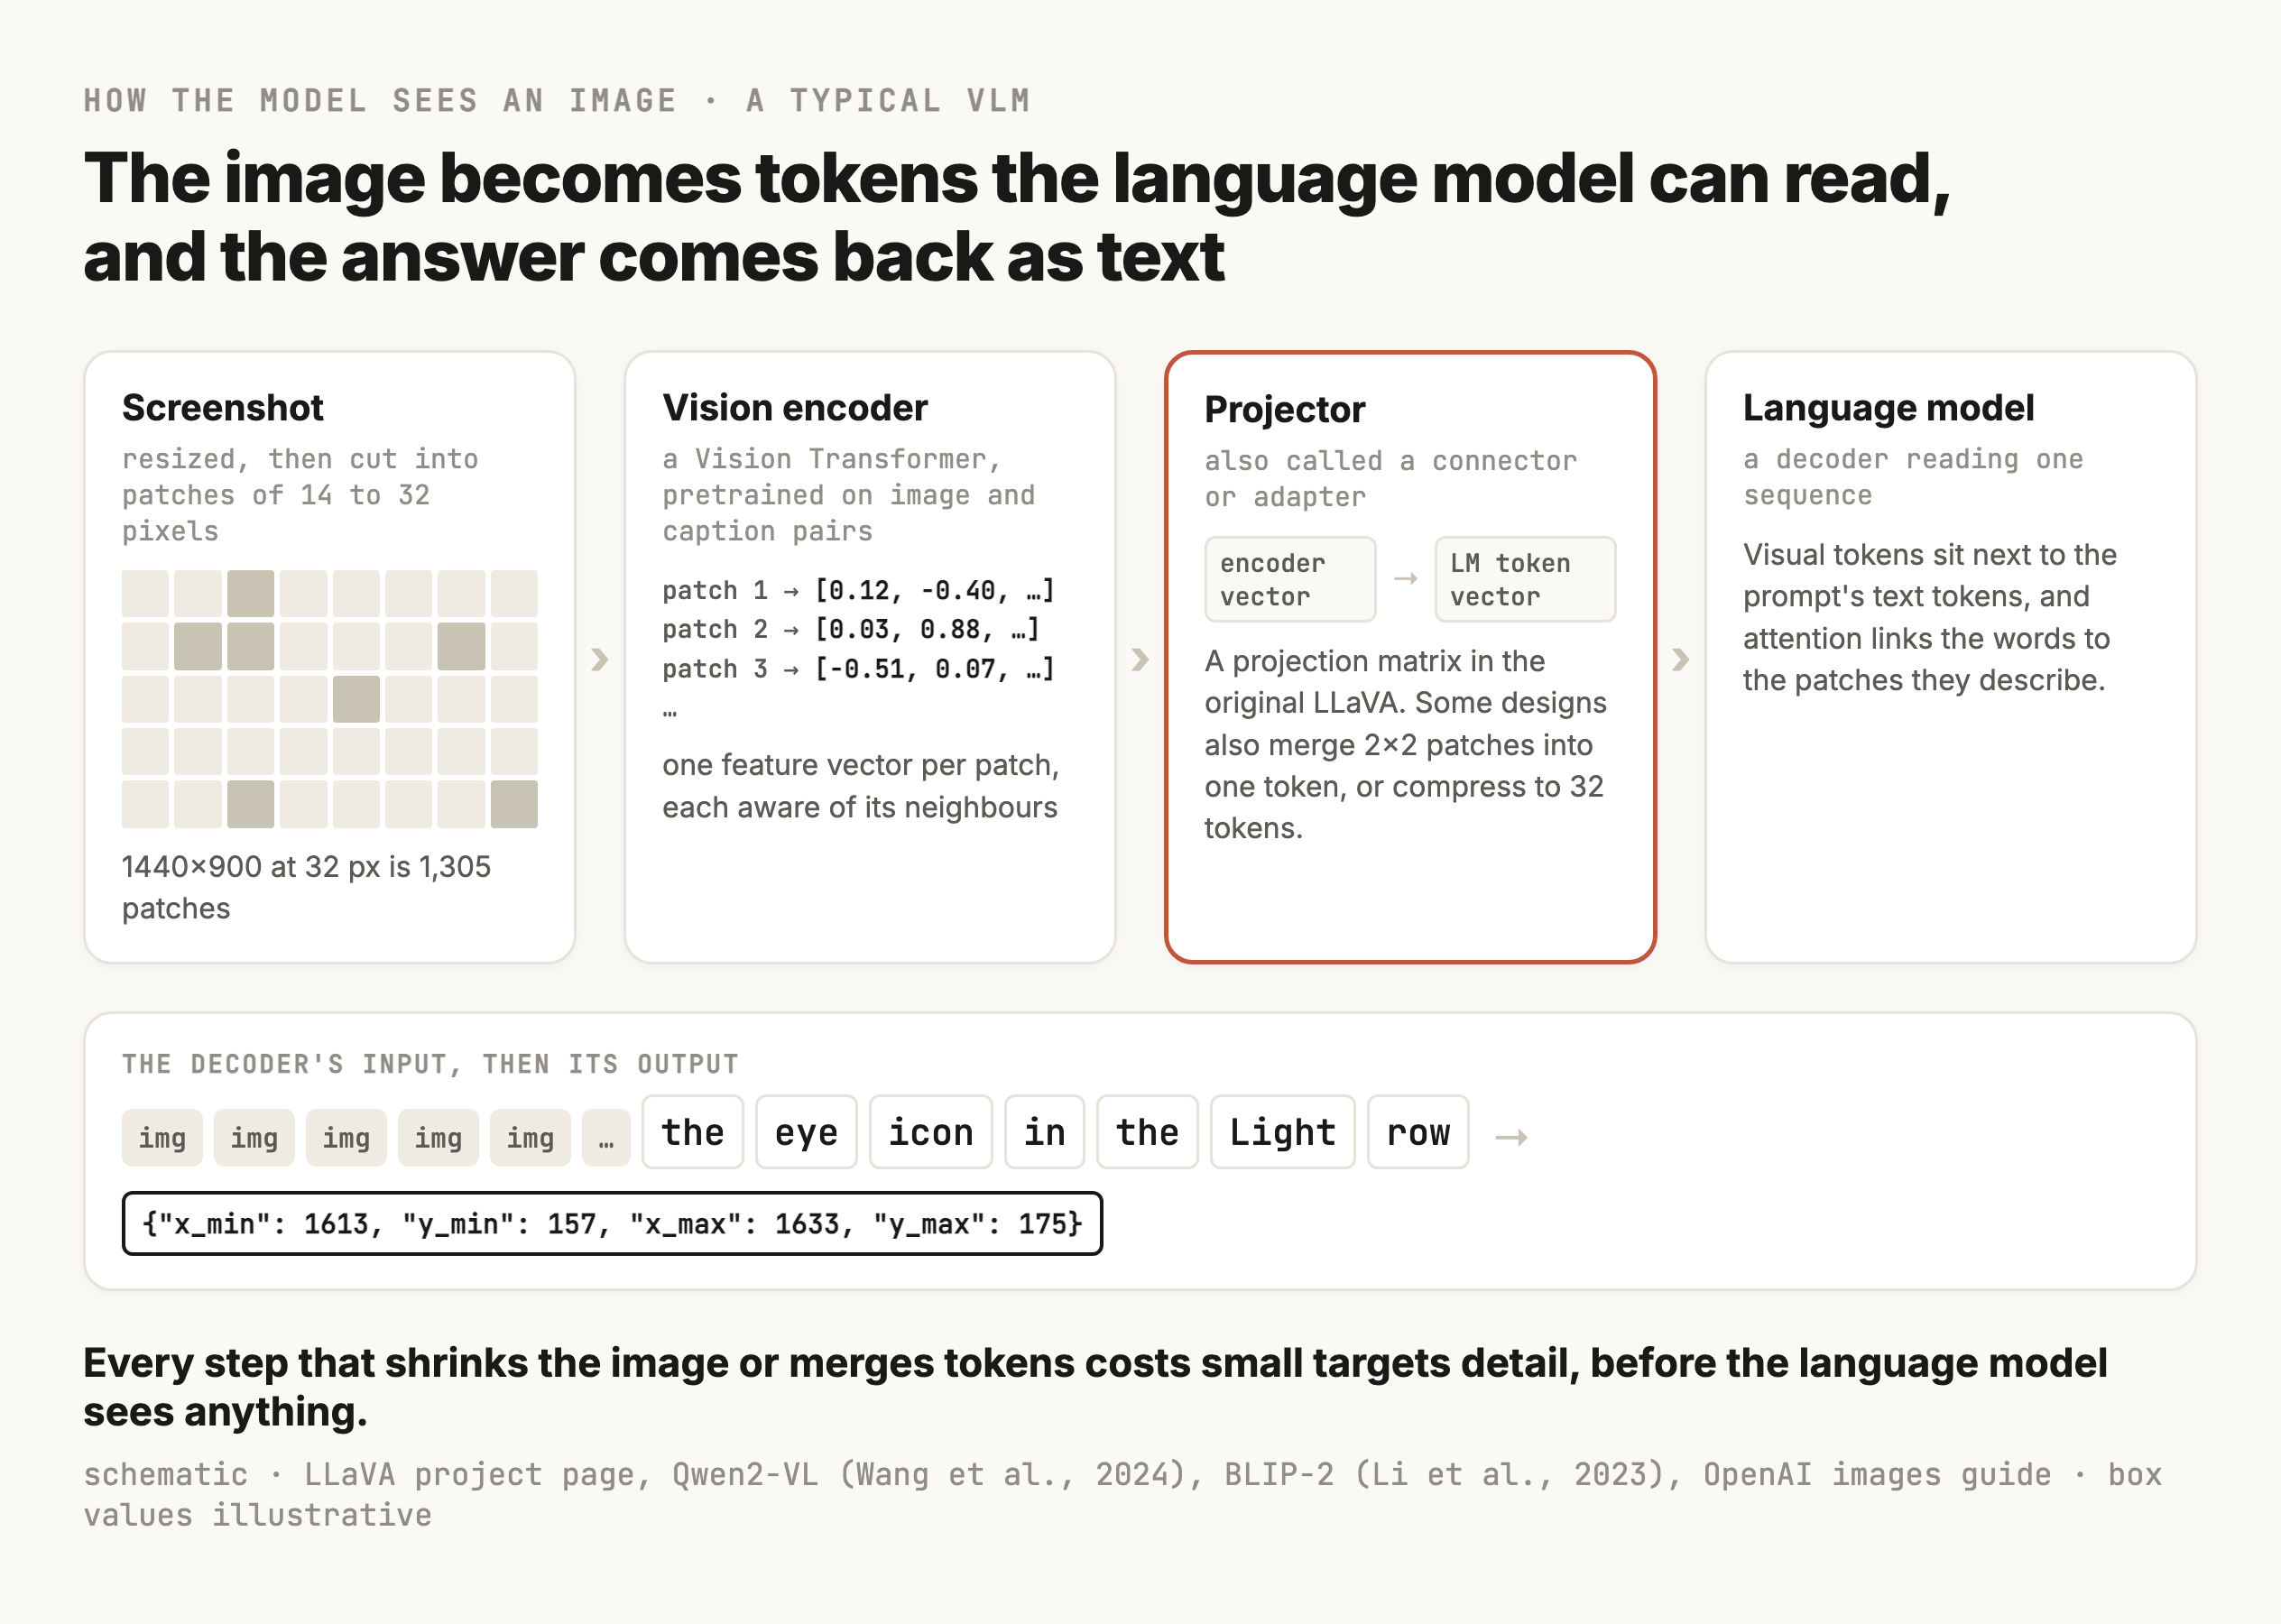
The vision encoder is usually a Vision Transformer, which cuts the image into a grid of patches and treats each patch the way a text transformer treats a word piece (Dosovitskiy et al., 2020). Every layer lets each patch look at every other patch, so by the end, the vector for a patch holding half an icon also carries information about the whole icon and the label beside it. Those vectors are the visual features. The encoder is typically pretrained on huge numbers of image and caption pairs, the way CLIP and SigLIP are, which is why its features line up with words well enough for a language model to use them.
The projector, also called a connector or adapter, is the small piece that makes a text-only decoder multimodal. The encoder's vectors have a different size and meaning from the decoder's token vectors, so the projector maps one into the other. It can be surprisingly simple. The original LLaVA connected a CLIP ViT-L/14 encoder to the Vicuna language model "using a simple projection matrix", and in its first training stage "only the projection matrix is updated", with the encoder and the language model left as they were (LLaVA project page). Other designs compress harder. BLIP-2's Q-Former uses 32 learned query vectors that pull what they need from the encoder's features, so every image becomes the same 32 tokens whatever its size (Li et al., 2023).
Once projected, the visual tokens sit in the decoder's input next to the text tokens, and the decoder's attention treats them like any other tokens. When you write "the eye icon beside Light", the words can attend to the patches that hold the word Light and the icon next to it, and that attention is where grounding happens. The answer comes out as text. Some models write coordinates as ordinary digits. PaliGemma added 1,024 special location tokens, <loc0000> to <loc1023>, and writes a box as four of them, y first (Beyer et al., 2024). Either way, a box is something the model generates one token at a time, and a model that was never trained to write boxes will write plausible-looking numbers that mean nothing, which is what the older models did.
Fixed resolution, dynamic resolution and tiles
How the image gets cut up decides how much detail survives, and designs differ most here. Early VLMs resized every image to the one square size their encoder was trained on, a few hundred pixels on a side. A 1440-by-900 screenshot squeezed into that loses most of its small text and icons before the model sees anything, and nothing afterwards can bring them back. Newer designs keep more. Qwen2-VL's dynamic resolution processes "images of varying resolutions into different numbers of visual tokens", so a bigger screenshot becomes more tokens, and then "a simple MLP layer is employed after the ViT to compress adjacent 2×2 tokens into a single token", which is how a 224-by-224 image ends up as 66 tokens (Wang et al., 2024). Another common approach cuts a large image into tiles, encodes each tile at the encoder's native size, and adds a small whole-image thumbnail for context.
This is why architecture decides how well a model grounds small things. Every step that shrinks the image or merges tokens trades detail for cost. A 12-pixel icon might start as one 14-pixel patch, get merged with three neighbours into one token, and share that token with part of a label, so the decoder has to locate something smaller than the unit it reads in. A model with fixed low resolution can't ground that icon at all, a model with dynamic resolution can if you send it enough pixels, and any model does better when you crop, which is section 8's coarse-to-fine design.
What resolution costs, and what the provider does to your image
With hosted models you don't choose the architecture, but you do choose the pixels, and they cost money. OpenAI's docs, as of September 2026, count how many 32-by-32-pixel patches cover the image and bill image tokens from that, with a multiplier of 1.2 for most current models (OpenAI images and vision guide). A 1440-by-900 screenshot needs 45 by 29 patches, 1,305 of them, so about 1,570 image tokens. The same screen from a Mac with a Retina display is 2880 by 1800, four times the patches.
The image the model sees is also often a smaller copy of the one you sent. Each detail setting has a limit, and larger images get scaled down to fit. For GPT-5.5 and similar models, the high setting allows "up to 2,500 patches and a 2048-pixel maximum dimension", so the 2880-by-1800 Retina screenshot, which needs 5,130 patches, gets shrunk. OpenAI's advice for anything coordinate-sensitive is to "resize images to fit those limits before sending them and map returned coordinates back to the original image". Anthropic's computer-use docs go further and reject a screenshot that's too big, because "the API doesn't downscale for you" (Anthropic computer use docs). Either way, the rule is the same. Decide the size of the image yourself, remember the scale factor, and never let a size change happen somewhere you can't see it.
Small targets are where all of this shows up. ScreenSpot-Pro, a benchmark of 1,581 instructions on screenshots from 23 professional applications, has targets that "occupy 0.07% of the screenshot area on average" (Liu et al., 2025). When it came out in April 2025, the best grounding model scored 18.9% and GPT-4o scored under 1%, and the authors' best result, 48.1%, came from a method that searches a smaller region at a time. That's one benchmark from 2025, and the models in section 1 are much better, but the lesson about small targets still holds, which is that cropping to a smaller region and asking again gives the model more pixels per icon.
Coordinates
Ask for numbers in one format, and convert them in your code
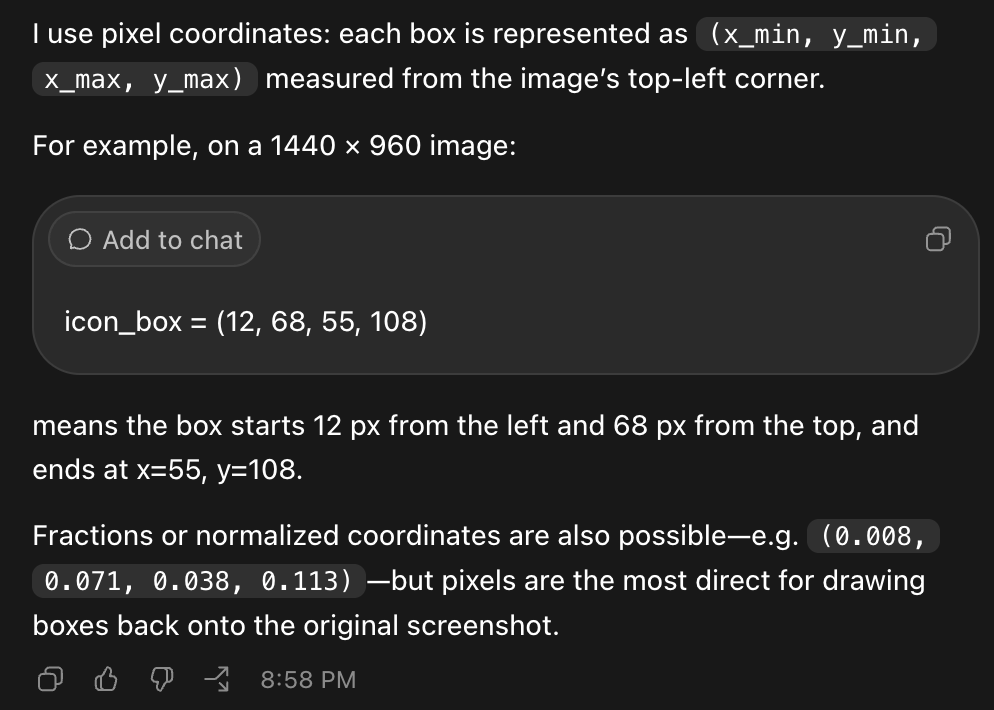
A box is four numbers, and there are several ways to write them, and nothing warns you when your code reads one format as another. The run in section 1 drew its boxes onto the image, and when an agent needs to click, it asks for the numbers themselves.
| Format | Order of the numbers | Scale | Where you meet it |
|---|---|---|---|
| Pixel corners | x_min, y_min, x_max, y_max | Pixels of the image the model saw | The run above, most detection libraries |
| Normalized corners | x_min, y_min, x_max, y_max | 0 to 1, fractions of width and height | Many annotation tools and datasets |
Gemini's box_2d | ymin, xmin, ymax, xmax | 0 to 1000 | Gemini's docs (Google) |
| PaliGemma's location tokens | ymin, xmin, ymax, xmax | 0 to 1023, as <loc> tokens | PaliGemma and models fine-tuned from it |
| Centre and size | x_center, y_center, width, height | Often 0 to 1 | YOLO training labels |
| A single point | x, y | Pixels of the screenshot | Computer-use tools, like Anthropic's left_click |
The y-first rows are the ones that catch people. Read [ymin, xmin, ymax, xmax] as if it were x first and every box comes back reflected across the diagonal, which is what Northlight's price test did. Getting the format wrong costs more than a few boxes. Roboflow found that on GPT-5.6, "Using the wrong coordinate format reduced GPT-5.6 detection performance by around 15 mAP points", out of about 46 (Roboflow, July 2026). So tell the model the format you want in the prompt, ask for JSON with named fields like x_min so the order is written down, and check the reply against a schema, as M4 did for any structured output.
Then convert everything to one format in your own code, in one place, with tests. Three conversions cover most agents.
def gemini_box_to_pixels(box_2d, width, height):
    """Gemini's box_2d is [ymin, xmin, ymax, xmax] on a 0-1000 grid."""
    ymin, xmin, ymax, xmax = box_2d
    return (xmin / 1000 * width, ymin / 1000 * height,
            xmax / 1000 * width, ymax / 1000 * height)


def crop_box_to_full(box, crop_origin, crop_scale=1.0):
    """A box found inside a crop, mapped back to the full screenshot's pixels."""
    x0, y0, x1, y1 = box
    ox, oy = crop_origin
    return (ox + x0 / crop_scale, oy + y0 / crop_scale,
            ox + x1 / crop_scale, oy + y1 / crop_scale)


def click_point(box, sent_size, screen_size):
    """Centre of a pixel box in the image the model saw, in the screen's click units."""
    x0, y0, x1, y1 = box
    sx, sy = screen_size[0] / sent_size[0], screen_size[1] / sent_size[1]
    return ((x0 + x1) / 2 * sx, (y0 + y1) / 2 * sy)
The last function is what fixed Northlight's missed clicks. On a Mac with a Retina display, a screenshot has twice as many pixels in each direction as the coordinates the operating system uses for clicks. Anthropic's docs put it plainly, "macOS Retina displays capture screenshots at a device pixel ratio of 2, so the image is twice the resolution of the logical screen coordinates", so "halve the coordinates Claude returns before issuing the click". Northlight's agent sent the full 2880-by-1800 screenshot and clicked at the pixel numbers that came back, on a screen that's 1440 by 900 in click units. Every click landed at twice its intended distance from the top-left corner, which is why the misses grew toward the bottom right. Passing sent_size=(2880, 1800) and screen_size=(1440, 900) halves them, and the same function covers a screenshot your code shrank before sending it. The middle function handles the other place coordinates change frame, which is a crop. If you cut out a region starting at (1360, 60) and enlarged it twice before asking again, a box in the crop maps back with crop_origin=(1360, 60) and crop_scale=2.
Test the conversions with numbers you can check by hand. A box at the exact centre of the image should click the exact centre of the screen, and a Gemini box of [0, 0, 500, 1000] on a 1440-by-900 image is the top half, (0, 0, 1440, 450). Those two tests would have caught both of Northlight's bugs before any click happened.
The agent loop
Screenshot, box, click, then look again
A computer-use agent repeats one loop. It takes a screenshot of the application as it is right now, asks the model where the next target is, converts the box to a click point, clicks, and takes another screenshot. The screenshot is the agent's only view of the application's state, so each loop starts from a fresh one, and a box from an old screenshot is only good until something on the screen moves.
This is M18's tool loop with the screen as the tool. The model decides what to do next and says where, and your code does the clicking. Anthropic's computer-use tool, for example, offers actions like screenshot, left_click with a coordinate, type and zoom, and its coordinates are "in the pixel space of the full-display screenshots you return, with the origin at the top left".
The step people skip is the last one, looking again. A click can land exactly where the model said and still do the wrong thing, because the box was on the wrong element, or a dialog opened between the screenshot and the click, or the click worked and the next screen took two seconds to draw. So after every click, the agent checks that the screen changed the way it expected. After clicking the Render menu, the menu should be open, and a small grounding call on the new screenshot, "is the Render menu's dropdown open?", or a crop compared with the menu's expected look, answers that. If it didn't change, the agent retries once from a fresh screenshot and then stops and reports, with the screenshots attached, which is M9's stop rule applied to clicks.
Ask for the target by what it says or looks like, "the Render menu", never by position, "the fourth menu", because positions change when a window is resized. And when a target is small or the screen is crowded, crop the region around the model's first answer, send the crop at full resolution, ask again, and map the answer back through the crop's offset with crop_box_to_full. Anthropic's tool has a zoom action for exactly this, and after a zoom "Claude still expresses coordinates in the full screenshot's space".
Write a Python click loop for a desktop app agent. Each step takes a screenshot, records its size in pixels and the screen's size in click units, and asks the vision model for the target's box as JSON with fields x_min, y_min, x_max, y_max in pixels of the image sent. Validate the JSON against a schema, convert the box centre to screen coordinates with a single function that takes the sent image size and the screen size, click, then take a new screenshot and ask the model whether the expected change happened. Retry once from a fresh screenshot on failure, then stop and save both screenshots. Write pytest tests for the conversion function, including a Retina test where the screenshot is 2880x1800 and the screen is 1440x900, and a crop test where a box found in a 2x enlarged crop maps back to the full screenshot.
Choosing the component
Pick a detector for what it was trained on, and a VLM for the rest
A VLM isn't the only thing that can find objects in an image, and for years it was the worst option. Which component fits depends mostly on whether your images look like what it was trained on.
A classic object detector, like the YOLO family, is trained on labeled boxes for a fixed list of categories and finds only those (Redmon et al., 2016). It's small and fast and runs locally for almost nothing per image, and on the categories it was trained on it's accurate. The list of categories is the catch. A detector trained on everyday photos knows people and cars and knows nothing about a Blender viewport button.
An open-vocabulary grounding model, like Grounding DINO, takes a text description and finds matching objects, including categories it was never trained on by name (Liu et al., 2023). It's the closest thing to a VLM's grounding in a local model. It still learned from photos, though, and UI icons are a different kind of image, flat and small and made to be read at a glance, so in my experience Grounding DINO isn't good at UI icons. The same goes for general image encoders like SigLIP and DINO, which weren't trained on much UI.
Then there are models trained on screens. Microsoft's OmniParser fine-tuned a YOLOv8 detector on "interactable regions extracted from popular webpage DOM trees" and pairs it with a captioning model that describes what each detected element does (Lu et al., 2024). It finds UI elements well, and what it returns is a list of boxes, one per element. Deciding which of those boxes is "the Render menu" is still a separate step. One common way to take that step is to draw a numbered mark on each detected box and ask a VLM which number matches the description, a technique called Set-of-Mark prompting (Yang et al., 2023).
Text on screen has its own cheap component, which is OCR. An OCR engine returns every piece of text with its box, exactly, in milliseconds, and for a target that's a word, like the Render menu or a "Release Notes" link, it's often the most reliable way to find it. It can't find an icon, and it can't tell you which of two identical words you meant, but it turns every label on the screen into an anchor you can reason from, which section 7 depends on.
And there are VLMs themselves, which since late 2024 have gone from bad at this to good. Google shipped Gemini 2.0 Flash in December 2024 with bounding-box output and a spatial-understanding demo, and in my experience Gemini was the first VLM whose boxes were good enough to use. Roboflow measured OpenAI's jump in July 2026, from 13.8 mAP@50 for GPT-5.5 to 46.2 for GPT-5.6 Sol on its detection benchmark, where mAP@50 is the standard detection score that counts a box as right when it overlaps the true one by at least half. In my experience GPT-5.6 and the GPT-6 models released in September 2026 ground UI elements well, and they're too new for anyone to know yet where they fail.
| Your situation | Start with | Why |
|---|---|---|
| Your images look like the detector's training data, and volume is high | A trained detector like YOLO | Fast, local, nearly free per image, and accurate on what it knows |
| Everyday objects named by text, run locally | Grounding DINO | Finds text-described objects without training, on photos |
| Every element on a screen, as a list | OmniParser | Trained on UI elements, and returns boxes you can pick from |
| The target is a word or label | OCR | Exact text and boxes in milliseconds |
| Things detectors weren't trained on, and you don't want to fine-tune | A VLM | Grounds almost anything a description names, for a few cents a call |
The line between these is moving fast. Fine-tuning a detector on your own UI used to be the obvious choice for accuracy and speed and cost. VLMs are now cheap enough, and good enough, that for many teams the question is only whether the volume and latency justify training and maintaining a detector. Northlight runs a few hundred agent steps a day, which is nowhere near that point, so it uses a VLM for every step. And as section 8 shows, the components also combine, so the choice is often which ones to chain together.
Use the VLM to label, and train the detector on its labels
You don't always have to choose between the two. A VLM that grounds well can do the slow, expensive part of building a detector, which is drawing the boxes on thousands of training images, and then a small detector trained on those boxes does the fast, cheap part in production. Roboflow, one of the biggest tools for labeling detection datasets, made this the default in September 2026. For object detection projects, its Auto Label feature's "default model for object detection projects is now GPT-6 Astra", which takes the class names you type and draws the boxes zero-shot, with no example boxes and no training (Roboflow, 8 September 2026).
That changes the trade above. Fine-tuning a detector on your own UI used to mean paying people to draw boxes for weeks. Now the labeling costs a VLM call per image, and the detector you train from it keeps the speed and low cost per image that make detectors worth having at high volume. The catch is that the labels are only as good as the model that drew them, and Roboflow points out that "every box comes back at full confidence, nothing is filtered out for you, so this pass is where the quality of the dataset is set." So a person still reviews the labels, ideally with the checks from section 10, before any detector learns from them. For Northlight, if the agent ever runs thousands of steps a minute, this is how it would get a detector for Blender's icons without anyone drawing a box by hand.
Repeated targets
Identical targets need a reference, and pixels can't give you one
Go back to the outliner in the Blender screenshot. It's a list of the scene's objects, one row each, with an eye icon at the right end of every row that shows or hides that object.
| Row | Label | Icon at the right |
|---|---|---|
| 1 | Collection | eye |
| 2 | Camera | eye |
| 3 | Cube | eye |
| 4 | Light | eye |
Northlight's agent had to hide the light before a test render, so the request was "click the eye icon for Light". Recognising an eye icon is easy, and every model since the spring found all four. The hard part is picking the one that belongs to the Light row. That's a different problem called reference resolution, working out which instance of a thing the description refers to, and it needs relational grounding, meaning the answer depends on the target's relationship to something else on the screen, here the word Light in the same row.
This is where an image embedding model, the SigLIP-style encoder from section 10, is honest and useless at the same time. Crop the four eyes, embed them, compare each with a reference eye icon, and all four score almost the same, because they are the same. The encoder is answering "which of these looks like an eye icon?" correctly, and that isn't the question. No amount of visual similarity can pick Light's eye, because the thing that makes it Light's is outside the crop.
What does pick it is context. The row's text is the anchor, and OCR finds "Light" exactly. The relationship is the row, since an icon and a label that share a vertical centre and sit in the same panel belong together, so the eye whose centre is closest to Light's centre on the y axis, and to the right of it, is the one. Hierarchy helps where you can get it. The outliner is a tree, and a nested object's eye sits in its own row under its parent. If the application exposes an accessibility tree, which lists every element with its name and its parent, the eye might even be labeled "Light visibility", and then there's nothing to ground. When none of that is available, a VLM can do the relational reasoning itself, given the crop of the whole panel and a request that names the relationship, "the eye icon in the same row as the label Light".
The Release Notes links on the splash screen are the same problem with text. There are two, one in the "Getting Started" column and one lower down beside the recovery options, and OCR finds both with perfect confidence. The description has to carry the difference, "the Release Notes link under Getting Started", and the harness has to check which one it got. This is the problem I spent the most time on, and what worked was a harness around the model, with encoders to find and filter candidates by look and the VLM to decide among them from the context, so that each part does the job it's good at. Section 8 turns that into an architecture.
Northlight changed two things after the camera incident. Its descriptions now always name the anchor, "the eye icon in the Light row of the outliner", and its test dataset has a slice of repeated targets on purpose, since a model can score well overall while getting every one of them wrong.
Grounding architectures
Three ways to build the grounding step
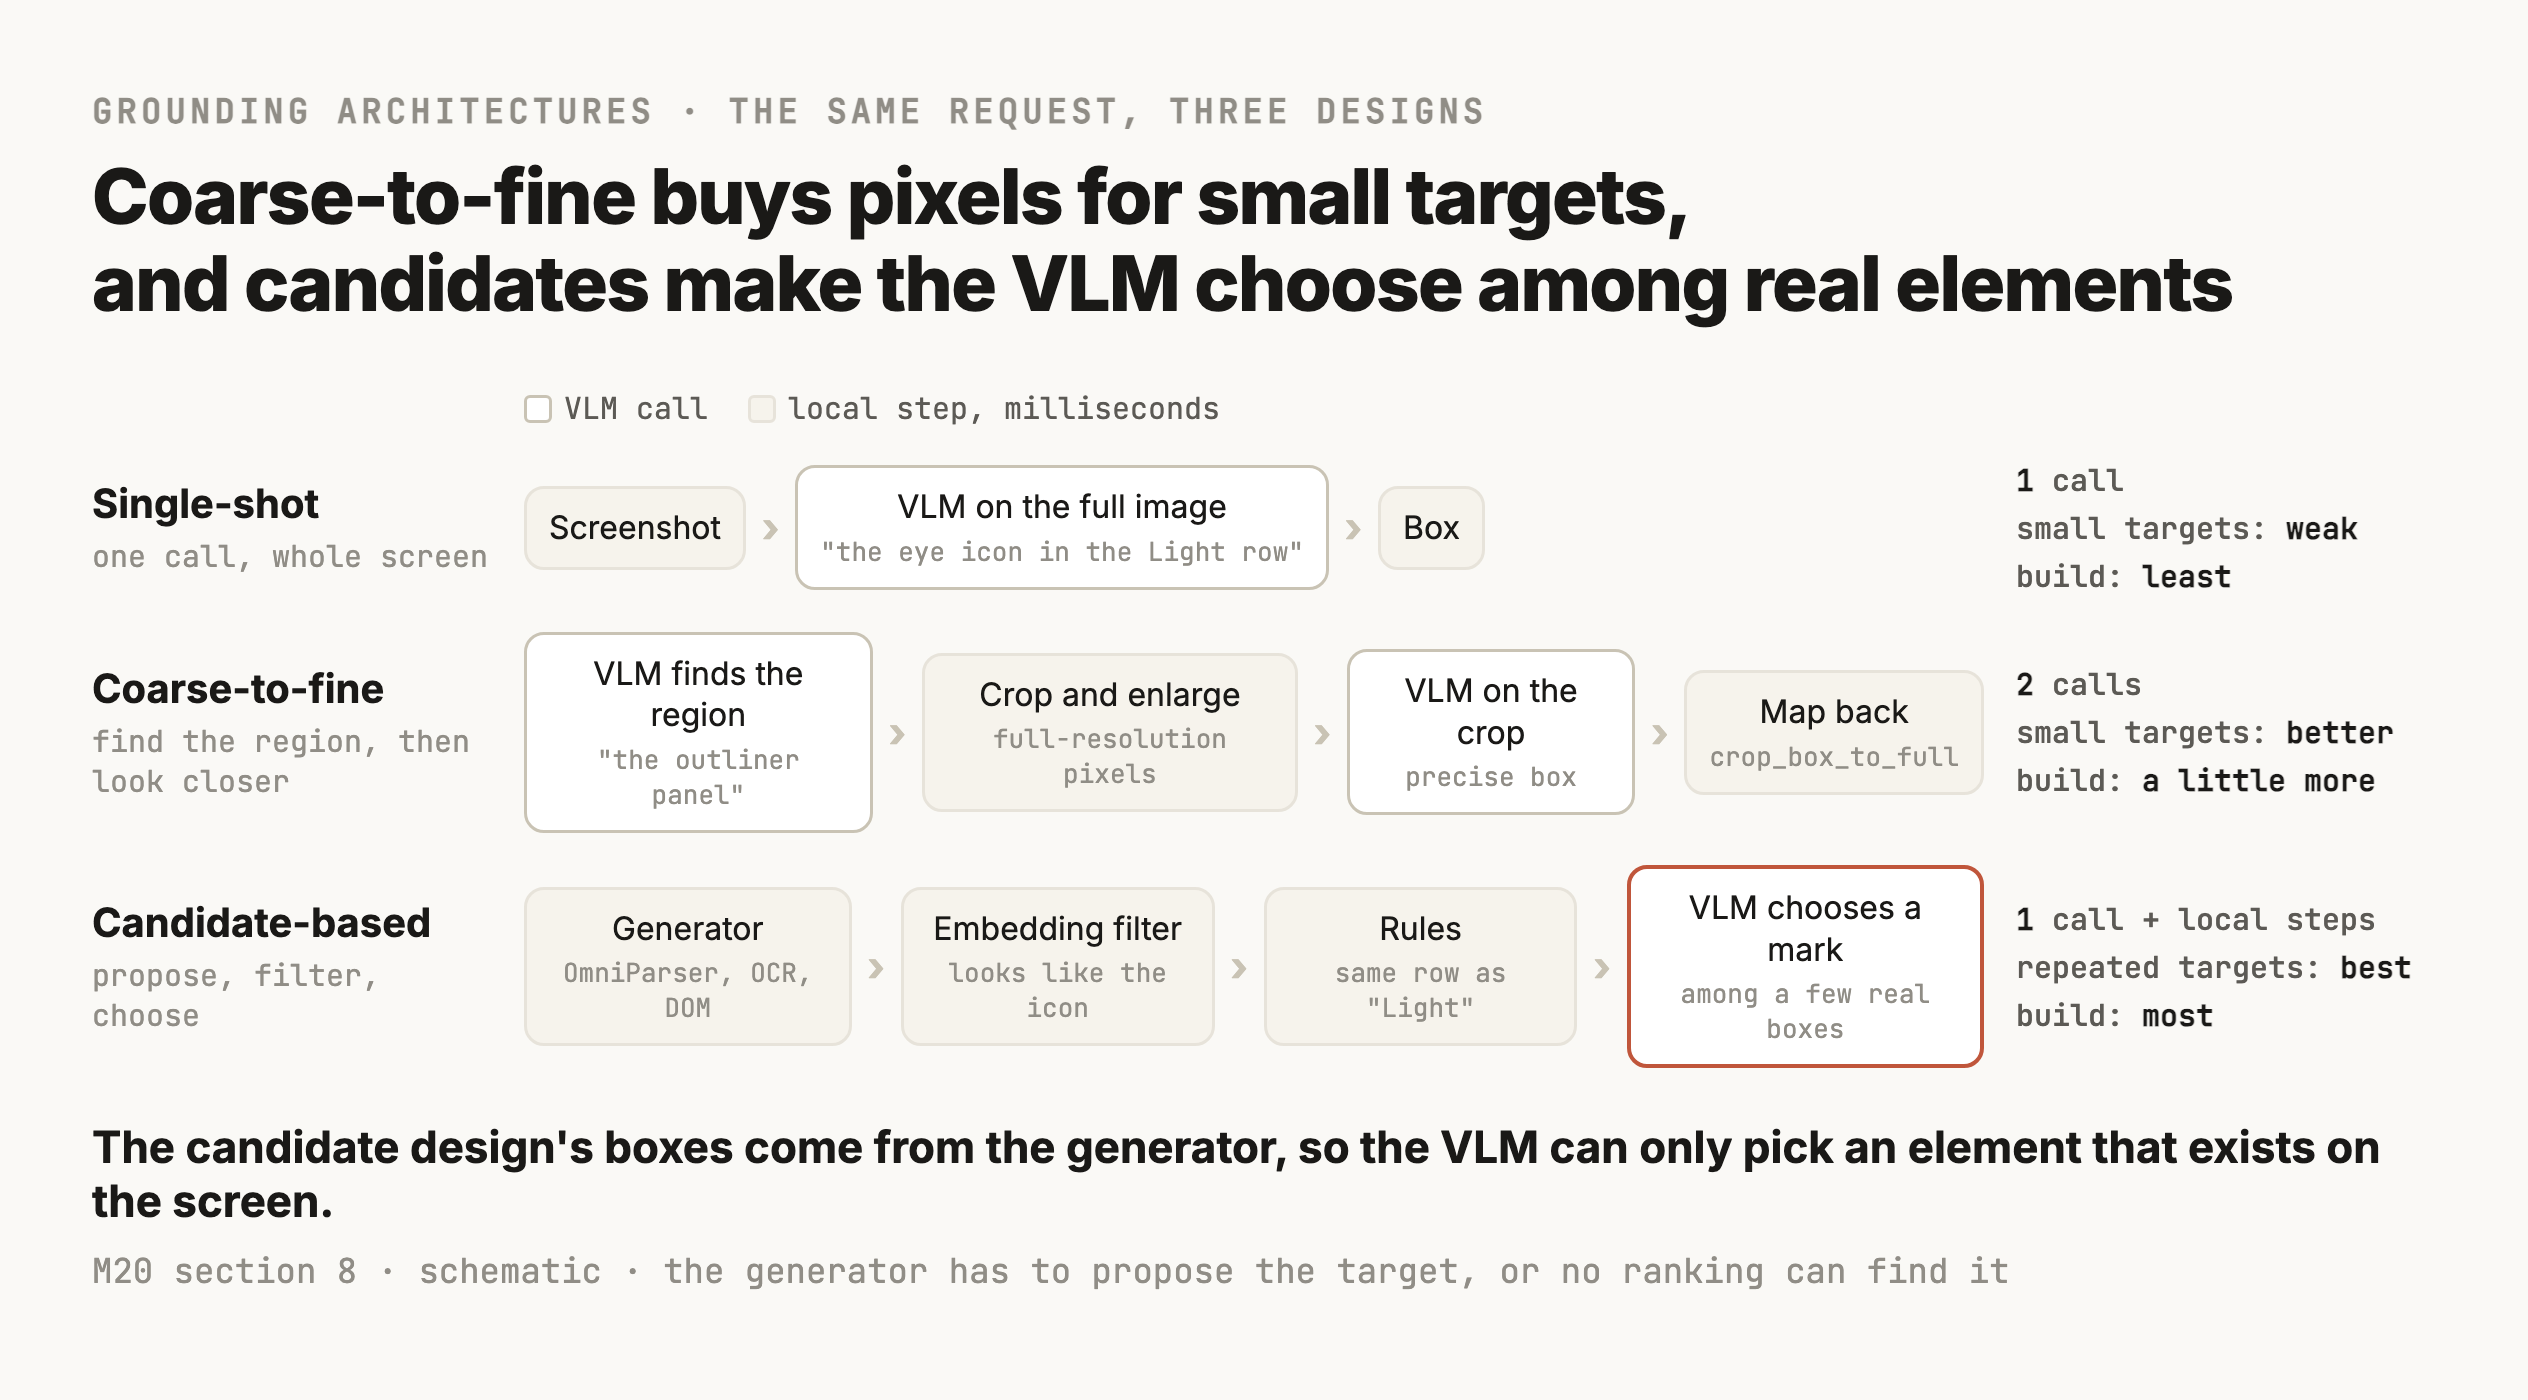
Sending the whole screenshot and a description to a VLM and clicking what comes back is one design. It's the simplest, and for many screens it's enough, but it isn't the only design, and on crowded professional screens the other two often do better.
Coarse-to-fine, for small targets
Coarse-to-fine grounding runs two passes. The first asks for the region that contains the target, like "the outliner panel", on a screenshot small enough to be cheap. The second cuts that region out of the full-resolution screenshot, enlarges it, and asks for the target inside it, so a 12-pixel eye icon that was a fraction of a token in the first pass now covers several. Then crop_box_to_full maps the answer back. It's the ScreenSpot-Pro lesson from section 3 turned into a design, and it costs a second call and a second wait on every step that uses it, so most agents only take the second pass when the target is small or the first answer looks unsure.
Candidate generation and ranking, for crowded screens
The candidate-based design splits grounding into two questions, where are the things that could be targets, and which one is it. A candidate generator answers the first, and it can be any component that proposes boxes. OmniParser proposes every interactable element. OCR proposes every word. An accessibility tree or a web page's DOM lists elements with names and positions, when the application exposes one. A detector or a segmentation model proposes objects. Then ranking narrows them down, cheaply first. Image-to-image embeddings compare each candidate crop with a reference crop, and image-to-text embeddings compare it with the description. Nearby text from OCR and spatial rules like "same row as Light" score the relationship. Interaction history counts too, since the button that worked last time on this screen is a strong candidate. Only the last few candidates go to a VLM, often as numbered marks in the Set-of-Mark style, with the question the embeddings can't answer.
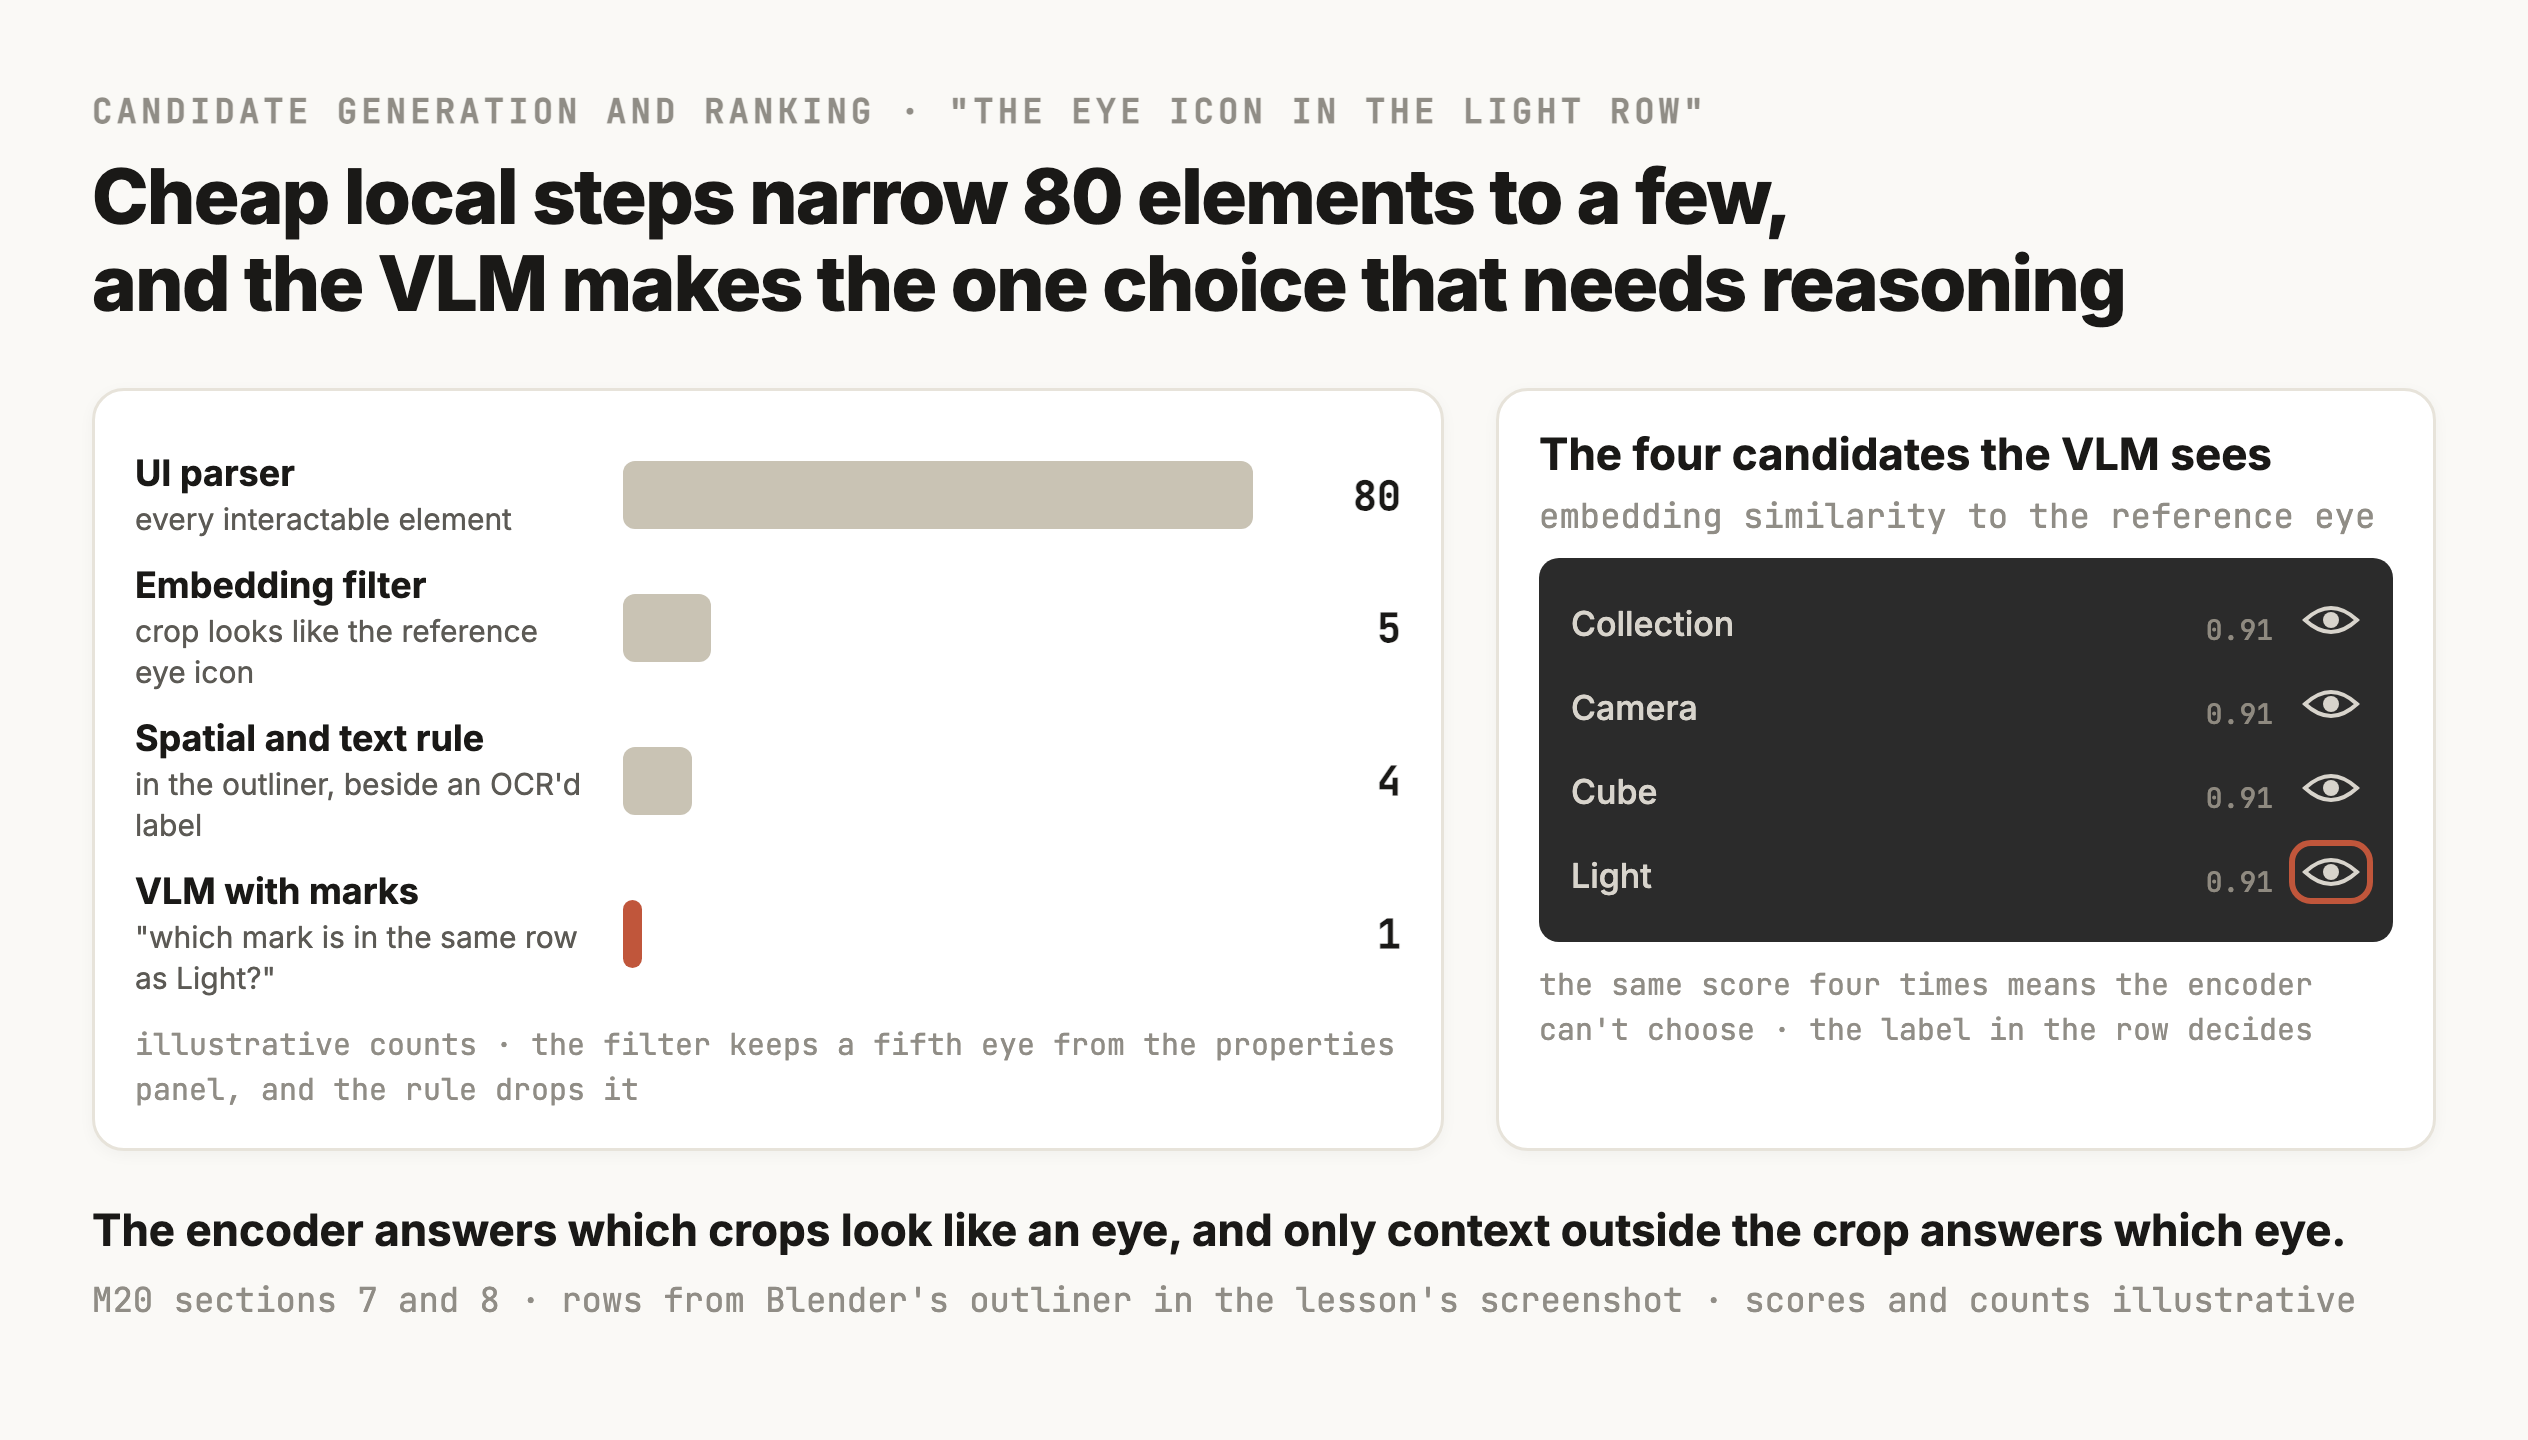
Narrowing the search helps in four ways. Accuracy goes up, because the VLM chooses among five marked boxes it can see clearly, where it would otherwise have to write coordinates for one icon among thousands of pixels. Latency and cost go down, since the filters are local and fast and the VLM sees one small request. Reliability goes up, because a candidate's box comes from the parser, so the model can't return a box a few pixels off or in empty space. And debugging gets easier, since you can see which stage dropped the right candidate, the same walk-back M19-1 taught for retrieval.
It's also more to build and more to break. The generator has to propose the target, or no ranking can find it, which is exactly the retrieval problem from M19-1, where a reranker can't recover what the search missed. You now maintain a parser, an encoder, thresholds and a VLM prompt. If your screens are simple, your targets are big or text, and single-shot passes your test dataset, the candidate pipeline is complexity you don't need. Northlight uses single-shot for menus, OCR for text targets, and the candidate pipeline only for icons in panels with repeats, which is where its failures were.
Embedding models and VLMs answer different questions
The hybrid pipeline works because it uses each model for the question it can answer. It's worth saying the boundary plainly, because mixing them up is a common design mistake.
| Image encoder, like SigLIP or CLIP | VLM | |
|---|---|---|
| Input | An image, or a text for the paired text encoder | An image and an instruction |
| Output | A vector, compared with other vectors by cosine similarity | Generated text, including boxes, choices or explanations |
| Answers | "Which candidate crop looks most like this reference icon?" | "Which eye icon belongs to the row labeled Light?" |
| Can't answer | Anything that depends on context outside the crop | Anything, fast and cheaply, a thousand times a second |
| Cost per comparison | Microseconds once the vectors exist, and runs locally | Seconds and a fraction of a cent per call |
An encoder compares looks. A VLM reads a scene and reasons about it. When the question is visual similarity, the encoder is faster, cheaper and deterministic. When the question is which instance, or what an element does, or whether the screen is in the expected state, only the VLM can answer it, and the art is in giving it only the few candidates the encoder couldn't separate.
| Single-shot | Coarse-to-fine | Candidate-based | |
|---|---|---|---|
| Accuracy on big or text targets | Good | Good | Good |
| Accuracy on small targets | Drops with screen size | Better, the crop adds pixels | Good if the generator finds them |
| Repeated targets | Depends on the description | Depends on the description | Best, relations are explicit |
| Model calls per step | 1 | 2 | 1, plus local steps |
| Latency | One call | Two calls | One call plus milliseconds |
| Boxes land on real elements | Not guaranteed | Not guaranteed | Yes, they come from the generator |
| Build and maintenance | Least | A little more | Most |
Uncertainty and abstention
Don't click when the answer is uncertain
A generative VLM hands back a box with no reliable sense of how sure it is. You can ask it for a confidence number and it will write one, but that number is generated text, like the box, and it isn't calibrated, which means a stated 0.9 doesn't come true nine times in ten. So a production grounding step needs its own evidence of certainty, and the good sources of it are the parts of the system you can measure.
The clearest one is the margin between the top two candidates. Here are two illustrative outcomes of the embedding filter for the same request.
| Candidate A | Candidate B | Margin | What it means | |
|---|---|---|---|---|
| Screen 1 | 0.91 | 0.90 | 0.01 | Two near-identical candidates, ambiguous |
| Screen 2 | 0.91 | 0.47 | 0.44 | One clear match |
Both top scores are 0.91, and only one of these should be clicked without more work. Screen 1 is the outliner eyes again, where a high similarity for everything is the sign of a reference problem, and the next step is the relational check from section 7. That's the same lesson M19-1 taught about similarity scores, which is that a score ranks candidates and says nothing about whether the top one is the answer.
Other proxies are worth combining. Agreement between two methods is strong evidence, like a VLM's box that contains the OCR box for the same word, or a candidate that wins on both the embedding ranker and the VLM. Agreement between two models costs a second call and catches the rare wild answer. Asking the VLM to verify, "is the element in this crop the eye icon for Light?", is cheaper than the original grounding because the crop is small. And the expected-state check after the click, from section 5, is the final proxy, since a click that produced the right screen was right whatever the scores said.
When the evidence is weak, the agent has better options than clicking and hoping. It can retry with a crop at higher resolution, which fixes perception problems. It can escalate to a stronger or more expensive model for that one step. It can ask for a better observation, like scrolling the panel so the row is fully visible, hovering to reveal a tooltip, or widening the window. Or it can abstain and hand the step to a person with the screenshot and the candidates it couldn't separate. Northlight's rule is to click only when the top candidate beats the second by a margin picked from its test dataset, or when two methods agree, and otherwise to crop and retry once and then ask. A wrong click in Blender can delete an artist's afternoon, and an extra second of checking can't.
Evaluation
Measure grounding against boxes or crops you trust
As M1 said about every model, you need your own dataset before you can say a grounding model works on your screens. For grounding that means screenshots of your application, each with a description of a target and a way to check the answer, and which way works depends on what reference you have.
When you have the correct box, check the overlap
If someone has drawn the correct box on the same screenshot, you can compare the model's box with it directly. Intersection over union, IoU, is the area the two boxes share divided by the area they cover together, so it's 1 for a perfect match and 0 when they don't touch, and 0.5 is the usual pass mark in detection benchmarks.
def iou(a, b):
    ix = max(0, min(a[2], b[2]) - max(a[0], b[0]))
    iy = max(0, min(a[3], b[3]) - max(a[1], b[1]))
    inter = ix * iy
    area = lambda r: (r[2] - r[0]) * (r[3] - r[1])
    return inter / (area(a) + area(b) - inter)
For an agent that clicks, a simpler check often counts for more, which is whether the centre of the model's box falls inside the correct box, because that's where the click lands. A box can have a low IoU and still click the right button, and a box with a decent IoU on a tiny icon can still put the click on the neighbour. Record both.
When you have a reference crop, compare the images
Often you don't have boxes on the same screenshot. You have a reference image of the target, like a crop of the Render icon from an earlier screenshot, and the screen you're testing on is a different size, or a different theme, or the icon moved. IoU needs both boxes on the same image, so it can't compare these. What you can do is crop whatever the model boxed and ask whether that crop shows the same thing as the reference.
My approach is to embed both crops with an image encoder and compare them with cosine similarity, the same comparison M19-1 used for text, and to test which encoder works for the images at hand. For UI elements SigLIP has worked best for me (Zhai et al., 2023), and for other images CLIP or DINO can be better. As M19-1 showed for text, a similarity score isn't a probability, so the threshold for "same element" has to come from labeled pairs of your own crops. The other approach is to send both crops to a VLM and ask whether they show the same element, which handles flipped or restyled icons well and costs a call per check. And keep section 7 in mind when you read a crop check, since a crop of the wrong eye icon matches the reference perfectly, so repeated targets need their boxes checked by position.
| Check | Needs | Good for |
|---|---|---|
| IoU of the two boxes | The correct box on the same screenshot | Comparing models on a labeled test dataset |
| Centre inside the correct box | The correct box on the same screenshot | Agents that click the centre |
| Encoder similarity of the crops | A reference crop, and a threshold from labeled pairs | Different screen sizes, themes or positions, for targets with no identical twin |
| A VLM asked whether two crops match | A reference crop, one extra call | Restyled or flipped icons, spot checks |
Slice the results, because the average hides the failures
Every example in the test dataset should carry a few labels besides its box, the kind of target, its size, whether it's text or an icon, how many look-alikes share the screen, the screenshot's resolution, the theme and the application. They cost seconds to add when you label, and they're what turns one accuracy number into a map of where the system fails. This is an illustrative result from Northlight's test dataset.
| Slice | Targets | Centre inside the correct box |
|---|---|---|
| All targets | 400 | 91% |
| Text buttons and menus | 150 | 98% |
| Icons at 24 pixels or larger | 120 | 96% |
| Icons under 16 pixels | 70 | 71% |
| Repeated targets, like the outliner eyes | 60 | 63% |
A 91% model sounds ready to ship. The slices say it's ready for menus, needs coarse-to-fine for small icons and needs the candidate pipeline for repeated ones, and that nine failures in ten come from two slices that are a third of the dataset. So the question to ask of a grounding eval is where the model fails, and "what's its accuracy" comes second. Northlight's test dataset is 120 screenshots of its own Blender scenes at three window sizes, with 400 targets described the way the agent describes them, and every model or prompt change runs against all of it, sliced, with the failures read one by one, the same way M19-1's retrieval failures were.
Grounding accuracy isn't the same as agent success
There are four different things you can measure, and each sits on top of the one before.
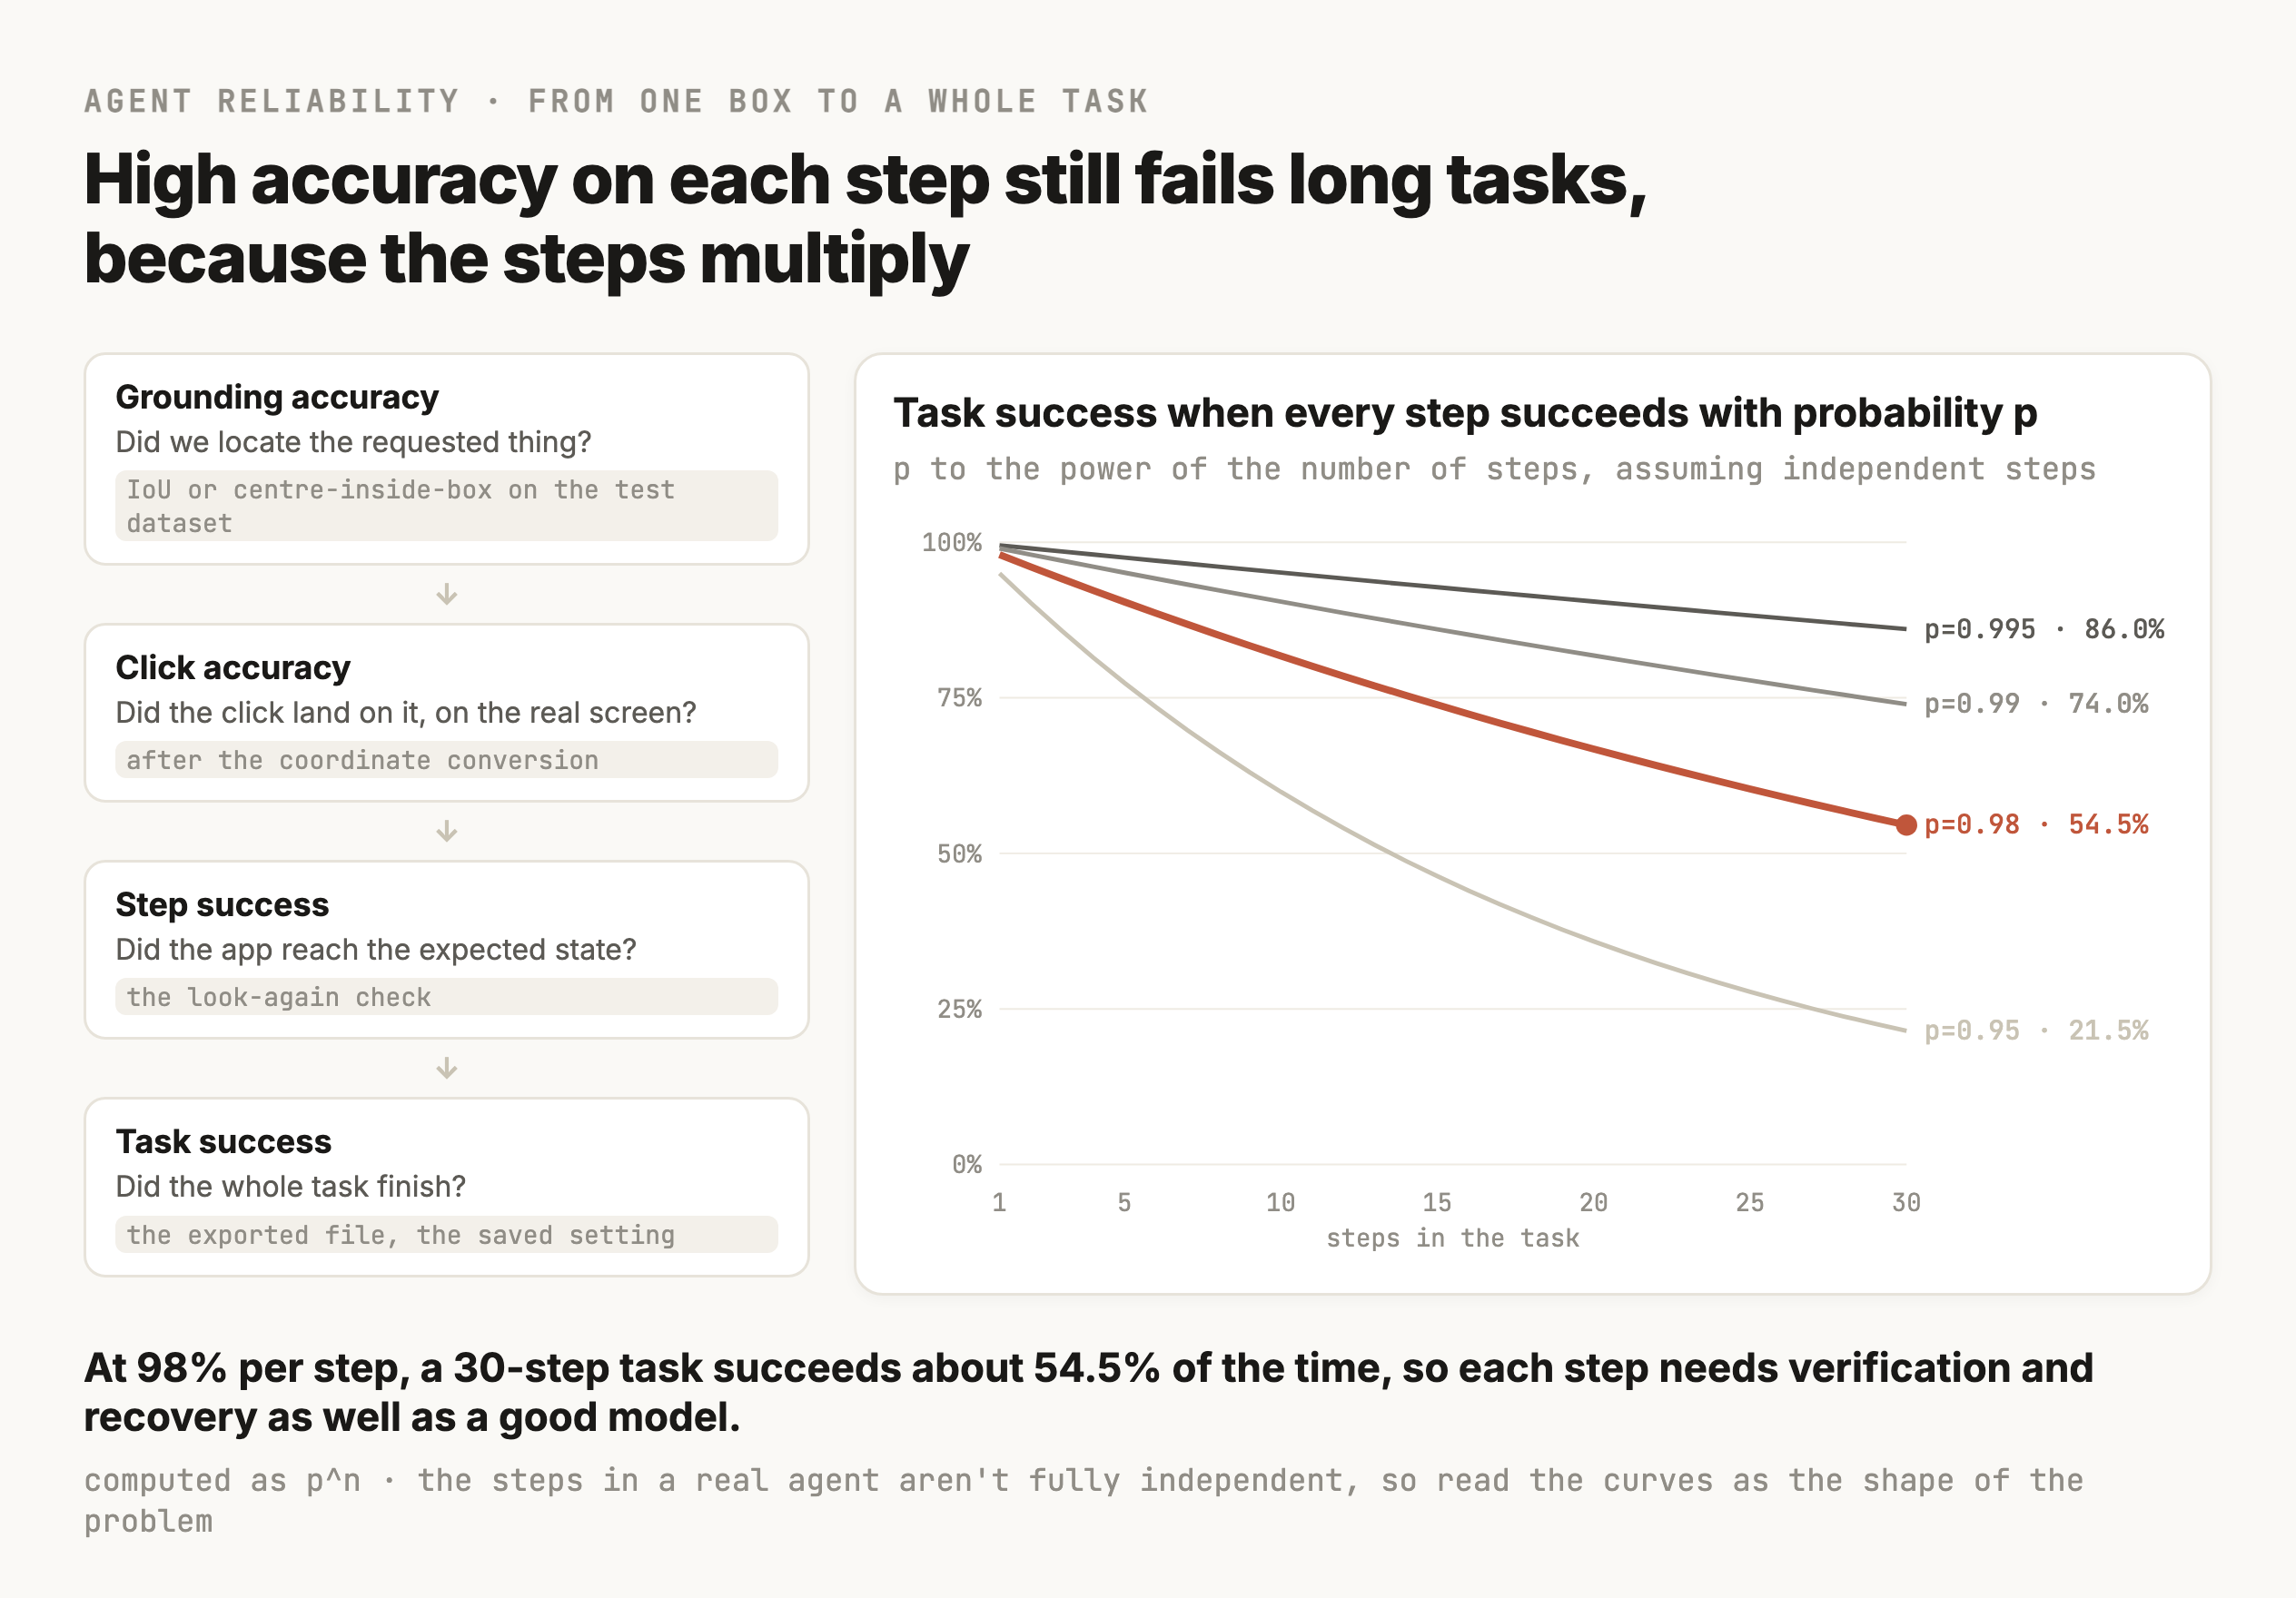
The gaps between levels are where bugs hide. Northlight's second version had good grounding accuracy and terrible click accuracy, which was the Retina factor. And the levels multiply. If each step succeeds 98% of the time, independently, a 30-step export task succeeds 0.98 ** 30, about 54.5% of the time, so a system that's right on almost every click fails nearly half its tasks. That's the arithmetic behind Northlight's artists losing trust in the two-minute export. It's also why agents need per-step reliability close to 100%, and why verification after each step and recovery on failure matter as much as a better model. A failed step the agent notices and retries costs seconds, while a failed step it doesn't notice ruins the task.
Failure taxonomy
Name the failure before you fix it
When a click goes wrong, "the grounding failed" is too vague to act on, because the fixes for different failures are different, and the wrong fix wastes a week. Every failed step falls into one of seven categories, and each points at a different remedy.
| Failure | What happened | How you tell | What fixes it |
|---|---|---|---|
| Perception | The target was too small, blurred, covered or lost in resizing | The target is barely visible in the image the model saw | Crop and enlarge, send more pixels, coarse-to-fine |
| Recognition | The model saw the region and misread what the element is | The box is on a real element of the wrong kind, like a lock icon for an eye | A clearer description, a reference crop, a stronger model |
| Reference resolution | Right kind of element, wrong instance | The box is on an identical twin of the target | Name the anchor in the description, OCR, spatial rules, candidates with a VLM chooser |
| Spatial or relational reasoning | It misread "beside", "under" or "in the toolbar" | The box is near the anchor on the wrong side, or in the wrong panel | Crop to the panel, state the relation plainly, candidate ranking by rule |
| Localization | Right element, bad box | The box is on the target but offset or oversized, and the centre misses | Refinement in a crop, a box from a parser, click the parser's centre |
| Coordinate system | The model's box was right, and your conversion was wrong | The box looks right drawn on the image the model saw, and the click misses in a pattern | Fix and test the conversion function |
| Execution or state | The click landed on the right target and the app didn't do the expected thing | The click is correct, and the next screenshot isn't | Wait for the redraw, verify, retry, handle dialogs and focus |
The order you check them in saves time, and the first check is always the same. Draw the model's box onto the exact image the model received, which may be smaller than your original screenshot. If the box is right there and the click was wrong, it's a coordinate failure, and no model change will fix it. If the box is wrong on that image, look at the target inside it. Barely visible means perception, visible but a different kind of thing means recognition, the right kind of thing but a twin means reference resolution or relational reasoning, and the right element with a sloppy box means localization. Only if the box and the click were both right do you look at the application's state, which is an execution failure.
Once grounding models got strong, many of the failures that matter in production moved into the system around them, into resizing, coordinate conventions, stale screenshots, reference ambiguity, verification and execution. That's where most of Northlight's time went. But the models still fail too, on tiny targets, dense interfaces, spatial relationships, repeated controls, poor images and screens unlike anything they trained on, so both kinds belong in the taxonomy. The newest models are too new for anyone to have mapped their failures, and I don't know yet where they fail. What's known comes from slightly older models and the benchmarks. Roboflow found that "Sol becomes less stable on images around 2,000 by 2,000 pixels or larger, especially at lower reasoning effort", and that at those sizes "GPT-5.6 Sol returned boxes in seemingly random parts of the image", often in "unnatural layouts, such as straight rows or evenly spaced groups" (Roboflow, July 2026). That's a perception and localization failure triggered by size, so a 4K screenshot should either go in smaller or go through coarse-to-fine, and boxes laid out in a neat grid that doesn't match the screen are a sign to check for.
The whole diagnosis fits on one page.
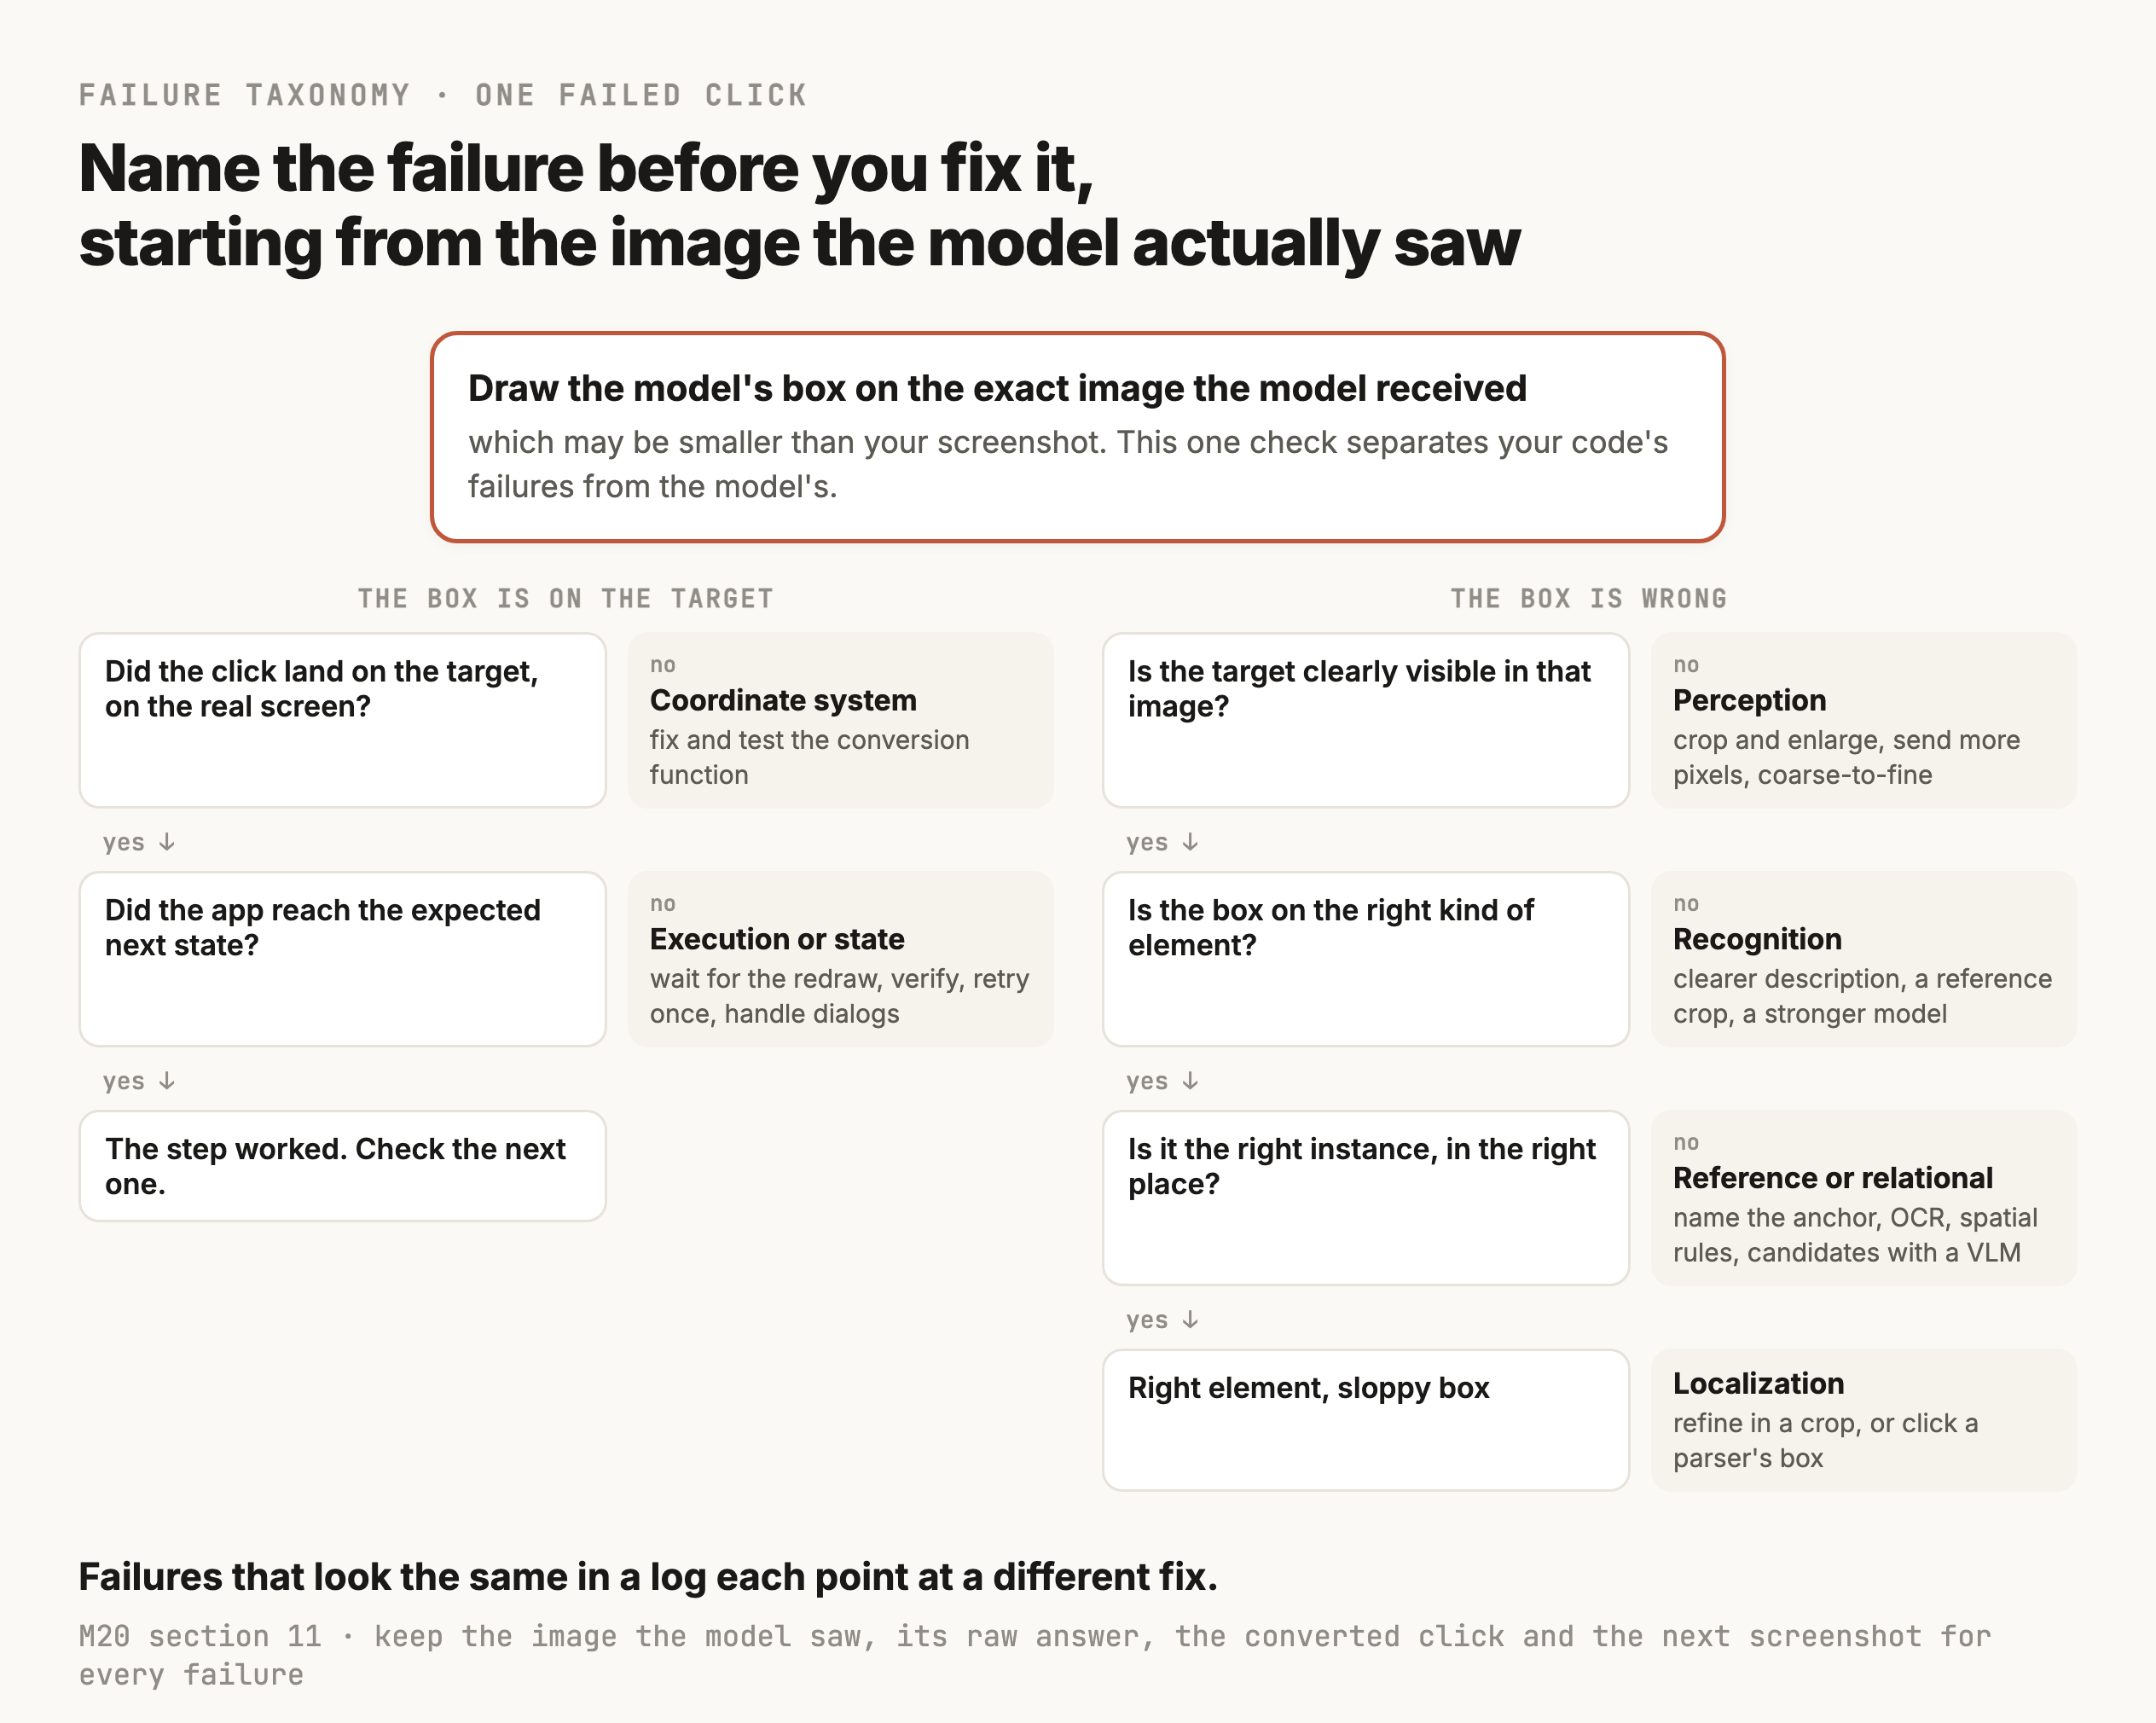
Keep the evidence for every failure, the screenshot the model saw, its raw answer, the converted click and the next screenshot. With those four, classifying a failure takes a minute, and without them it's a guess, because a grounding failure is impossible to debug from a log line and obvious from the pictures.
When to fine-tune
Fine-tune only when systematic failures remain
Fine-tuning is the last step on a long ladder, and most grounding problems are solved on the lower rungs. Before training anything, make sure the prompt asks for a stated format as structured output, that the coordinate conversion is tested, that screenshots reach the model at a resolution where the targets survive, with crops where they don't, that candidates come from a generator where the screen is crowded, and that a sliced test dataset says exactly where the remaining failures are. If one slice still fails systematically after all that, like every icon in one custom panel, fine-tuning is worth considering, and M21 covers how.
What you fine-tune depends on which part is failing. Fine-tuning a detector like YOLO on your own UI gives you a fast candidate generator, and it's the cheapest training to run, especially with VLM-drawn labels from section 6. Fine-tuning an image encoder on your own crops makes the embedding ranker separate your icons better, which helps when two different icons look alike to a general encoder. Fine-tuning the VLM itself on your screens and descriptions is the most expensive and the only one that fixes reasoning, like reference resolution in an unusual layout. And some open VLMs let you train only the projector, the way LLaVA's first stage did, which is cheap and helps the language model make better use of features the encoder already has, though it can't fix an encoder that never saw your kind of image.
Whichever you train, the examples that teach the most are hard negatives, wrong answers that look almost right. For the target "the eye icon in the Light row", the positive example is Light's eye, and the hard negatives are the Camera, Cube and Collection eyes, which are identical in pixels and wrong in position. Easy negatives, like the Render menu, teach the model nothing it doesn't already know. When visually similar candidates dominate your screens, as they do in any list, table or toolbar, a training dataset without hard negatives teaches the model to find eye icons, which it can already do, and leaves it unable to pick the right one, which was the problem.
Operations
Cost and speed per click
A grounding call costs what any VLM call costs, the image tokens plus the text, and at current prices that's a few cents or less. Roboflow's measurements from July 2026 put GPT-5.6 Sol at about 10 seconds and 2.5 cents per image, Terra at about 6 seconds and 1 cent, and Luna at about 5 seconds and under half a cent. OpenAI released GPT-6.1 Sol on 29 September 2026 at $2 per million input tokens and $10 per million output tokens, so the roughly 1,570 image tokens of a 1440-by-900 screenshot cost about a third of a cent on the way in (TechCrunch, 29 September 2026). Reasoning tokens and the answer come on top, and with a reasoning model those can be most of the cost.
For an agent, speed is a bigger problem than cost, because every step waits for a call. At several seconds per grounding call, a 20-click task takes minutes, where a person takes seconds. A local detector, OCR engine or embedding ranker answers in milliseconds, which is why detectors still win at high volume, why the candidate pipeline in section 8 is often faster than single-shot, and why the component question in section 6 comes down to volume and latency as much as accuracy. Coarse-to-fine doubles the calls on the steps that use it, so it's worth gating on target size or uncertainty. For Northlight, a chore that took an artist ten minutes of attention now takes the agent three minutes of nobody's attention, which is the trade that made it worth building.
Resolution is the main lever on both. A smaller screenshot is fewer image tokens and a faster call, and smaller icons, so the right size is the smallest one at which your sliced test dataset still passes on the slices you care about, found by running it at two or three sizes.
Hands-on
Build a grounding system for one application, and take it apart
Pick a desktop or web application you use, one with small icons and some repeated controls, like a layers panel or a list with an action per row. Blender, a code editor or a design tool all work. By the end you'll have numbers and failures from your own system, which is what makes this something you can talk about in an interview.
Build the test dataset first
Take 30 or more screenshots across at least two window sizes, and on each write down two or three targets the way an agent would describe them. Make sure the dataset includes large targets, tiny icons under 16 pixels, text buttons, icons, and repeated targets like one eye icon among four identical ones. Draw the correct box for each, save a crop of each target as a reference image, and label every example with its slice, meaning target type, size, text or icon, look-alike count and screenshot resolution.
Compare two approaches, at two resolutions
Implement single-shot grounding with a VLM and one other approach, either coarse-to-fine or a candidate pipeline with OCR or OmniParser. Run both at two screenshot resolutions. Ask for boxes in a stated format with JSON checked against a schema, convert every answer in one tested function, and score IoU and centre-inside-box against your boxes, sliced by target type and size. Record the time and cost of every call.
Probe embeddings and uncertainty
Rank candidate crops with an image encoder, SigLIP to start. Find one example where it clearly helps, like picking an icon among many different ones, and one where it can't solve the problem alone, like the repeated targets. For the repeated ones, record the top-two margin, and decide the rule you'd use to click, crop and retry, escalate or abstain.
Then build the loop, and break it
Build the screenshot, ground, click, verify loop from section 5 on top of your better approach, with the coordinate conversion tested for your display's scaling and for crops, and saved screenshots on every failure. Run it on one real task of five or more steps, a few times. Then collect at least three failures and classify each with the taxonomy from section 11.
What to hand in
- The test dataset, with its slice labels and a line on why each screen is in it.
- A table of both approaches at both resolutions, overall and per slice, with IoU, centre-inside-box, time and cost.
- The tests for your coordinate conversion, including your display's scaling, a crop mapped back, and one provider's format that isn't pixel corners.
- One coarse-to-fine example, with the screenshot, the crop and both answers.
- The embedding example that helped, the one it couldn't solve, and your confidence rule with the margins that justify it.
- At least three failures with their screenshots, each classified and paired with the fix it points to.
- The task's success rate over your runs, next to your per-step success rate, and whether the two agree with the multiplication in section 10.
- A short note on whether a detector or fine-tuning would be justified for this application, and what evidence would change your mind.
Putting it together
Putting it together
Visual grounding turns a description into a position. A VLM does it by cutting the screenshot into patches, encoding them into visual features, projecting those into tokens its language model can read next to your text, and writing a box back one token at a time, and every step that shrinks the image or merges tokens costs small targets some of their detail. For years VLMs could recognise things without placing them. That changed with Gemini 2.0 and then sharply with GPT-5.6 and the GPT-6 models, which ground UI elements on a crowded professional screen from one instruction.
Once grounding got that good, many of the failures that matter in production moved into the system around the model. The image the model saw has to be the image your code thinks it saw, the box has to be read in the format the model used, and the click has to be scaled to the screen's own units, all in one tested function. Identical targets need a reference, found from nearby text, rows and hierarchy, because pixels alone can't separate twins. The models still fail on tiny targets, repeated controls, spatial relationships and unfamiliar screens, so the design counts too. Single-shot is simplest, coarse-to-fine buys pixels for small targets, and candidate generation with ranking uses embeddings for looks and a VLM for reasoning, with fewer and better choices for the VLM to make.
An agent built on that clicks only when it has evidence to, checks every click by looking again, and names each failure before fixing it. It's measured on its own application's screens, sliced by the kinds of target that fail differently, and judged by task success, since per-step accuracy multiplies. And it reaches for fine-tuning last, with hard negatives, when a slice keeps failing after everything else.
| Part | What it does |
|---|---|
| Screenshot | Captured fresh each step, its pixel size and the screen's click size recorded |
| Request | The target described by what it says or looks like, with its anchor named, the box format stated and JSON required |
| Architecture | Single-shot for menus, OCR for text targets, candidates with a VLM chooser for repeated icons, coarse-to-fine for small ones |
| Conversion | One tested function from the model's format, and from crops, to screen click coordinates |
| Confidence | Click when the top-two margin is wide or two methods agree, otherwise crop and retry once, then ask a person |
| Checks | Box inside the image, and a look-again after every click |
| Measurement | 400 targets on 120 screenshots, sliced by target type and size, rerun on every change, with task success tracked apart |
M18 covers the tool loop the agent runs, M19-1 the embeddings and similarity scores used to rank candidates, and M21 the fine-tuning this module only decides on. M23 applies grounding to fields on documents, and M30 puts screenshots and clicks inside agents that run whole tasks for hours.
Checkpoint · recall · 5 questions
What the module said
- 01
What does visual grounding add to what a VLM could already do?
- 02
What does the projector in a VLM do?
- 03
In what order does Gemini's
box_2dgive a box's numbers? - 04
Why does a Mac with a Retina display cause clicks to miss when an agent sends the raw screenshot?
- 05
What does OmniParser return for a screenshot?
0 / 5 answered
Checkpoint · understanding · 5 questions
Reason it through
- 01
The four eye icons in Blender's outliner embed to almost identical vectors. Why can't an image encoder pick the one for Light?
- 02
Northlight's clicks missed by more the further the target was toward the bottom right. What does that pattern point to?
- 03
The embedding ranker scores the top two candidates 0.91 and 0.90. What should the agent do?
- 04
Each step of an agent succeeds 98% of the time. Why does a 30-step task still fail often?
- 05
When is candidate generation and ranking unnecessary complexity?
0 / 5 answered
Checkpoint · debugging · 4 questions
Debug it
- 01
After switching providers, every box Northlight draws back onto the screenshot looks mirrored across the diagonal, landing near where the target would be if x and y were swapped. What's wrong?
- 02
The agent's box for "the Render menu" is correct, the click lands on it, and the next screenshot shows no menu open. Which failure is it, and what should the agent do?
- 03
On a 4K monitor, grounding accuracy on small icons drops sharply compared with the same app on a laptop screen. What's the likely failure type, and the fix?
- 04
Asked to hide the light, the agent clicks the eye icon in the Camera row. Drawn on the image the model saw, its box sits exactly on the Camera eye. Which failure is it, and what fixes it?
0 / 4 answered
Go deeper
Liu et al. (2025): ScreenSpot-Pro, GUI grounding for professional high-resolution computer use · Liu et al. (2023): LLaVA, visual instruction tuning · Wang et al. (2024): Qwen2-VL, dynamic resolution and visual token merging · Li et al. (2023): BLIP-2 and the Q-Former · Beyer et al. (2024): PaliGemma, location tokens for detection · Lu et al. (2024): OmniParser for pure vision based GUI agent · Liu et al. (2023): Grounding DINO, open-set object detection from text · Yang et al. (2023): Set-of-Mark prompting for visual grounding in GPT-4V · Dosovitskiy et al. (2020): An Image is Worth 16x16 Words · Zhai et al. (2023): SigLIP, sigmoid loss for language image pre-training · Roboflow (July 2026): GPT-5.6 Sol is the best vision model OpenAI ever released · Anthropic: computer use tool, coordinates and screenshot scaling · Google: Gemini image understanding and bounding boxes · OpenAI: images and vision, resizing and image tokens
That's the last one written so far
Pick your next module from the board.